

Troubleshooting Black Garlic Making: Common Issues and Solutions
Ever notice how anything that seems easy, like making the latest viral recipe, always comes with a catch or two? Black garlic looks mysterious and rich, but when you walk by your rice cooker and get a whiff of that almost burnt sugar scent, it suddenly feels like black magic gone awry. It might have happened for you, too. Over 60% of home cooks who attempt black garlic for the first time end up facing at least one quirky hiccup in the process. I know because last weekend, my garlic went from “almost there” to “uh oh” in a single night. Troubleshooting black garlic making soon became my new obsession.
Almost as soon as you begin, making black garlic at home begins a journey filled with sticky-sweet curiosity—and a few kitchen mishaps you just don’t see coming. Maybe your garlic went dry and hard or has come out more grayish than jet-black. If that struggle sounds familiar, you’re already halfway through the Troubleshooting Black Garlic Making learning curve. Grab your tongs; let’s gently turn—without panic—any mistakes into breakthroughs. Ready to dive in?
Understanding the Black Garlic Making Process
If you’ve ever bitten into a piece of black garlic, you know it’s nothing like your usual kitchen staple. Imagine soft cloves, rich and jammy, almost tasting like balsamic vinegar and roasted garlic had a delicious lovechild. The star of the show is really what you do to fresh garlic bulbs rather than a specific variety. Making your own is especially handy if you can’t find high-quality black garlic at your local grocery store or if you simply relish the “I made this myself” satisfaction. There’s also bragging rights, but we won’t tell.
The Step-by-Step Process to Crafting Black Garlic
In a nutshell (or rather, in a garlic bulb), the black garlic making process starts with clean, whole garlic bulbs. The science is pretty simple: you take the bulbs, expose them to sustained low heat and moderate humidity, and let a magical transformation called the Maillard reaction take its course. Unlike fermenting sauerkraut, you don’t add weird bacteria or crazy vinegars. It’s just time and heat.
Set up is key for a successful batch—and for troubleshooting black garlic making, if things go sideways. The easiest way for most home cooks is to use a slow cooker or a rice cooker. Wrap the bulbs in a clean paper towel, nestle them into the pot, and let them sit at a steady 140–170°F with the lid cracked open to avoid steam buildup. Don’t rush it. Black garlic loves time, and thirty days of patience results in those signature dark, tender, sweet-smelling bulbs.
There are, naturally, a few things that can trip up new black garlic makers; troubleshooting black garlic making is part of mastering the process. One biggie is temperature: too hot, and the garlic dries out and becomes bitter. Too low, and you’ll wait for eons for anything interesting to happen. Humidity also matters. Many home cooks tuck a bowl of water into the cooker or mist the bulbs every week to help keep things supple and delicious. If your bulbs come out more on the rubbery side, it’s usually a moisture issue.
Of course, patience sometimes matters more than gadgets or wisdom from garlic-running grandmas. Give your bulbs enough time and you’ll be rewarded with deep, rich flavor. This process might seem intimidating at first glance. But with these basics, a few tweaks, and perhaps a bit of smell-proof tupperware for leftovers, you’re ready to tackle black garlic with confidence. Helpful if the regular grocery store is letting you down.
Common Black Garlic Making Problems and Their Causes
Making black garlic at home is a quirky kitchen project. Still, even the boldest home cooks often get tripped up by some common snags. Let’s break down these frustrating hurdles and why they show up, so you can tackle them before they spoil your batch.
Typical Black Garlic Issues and Their Roots
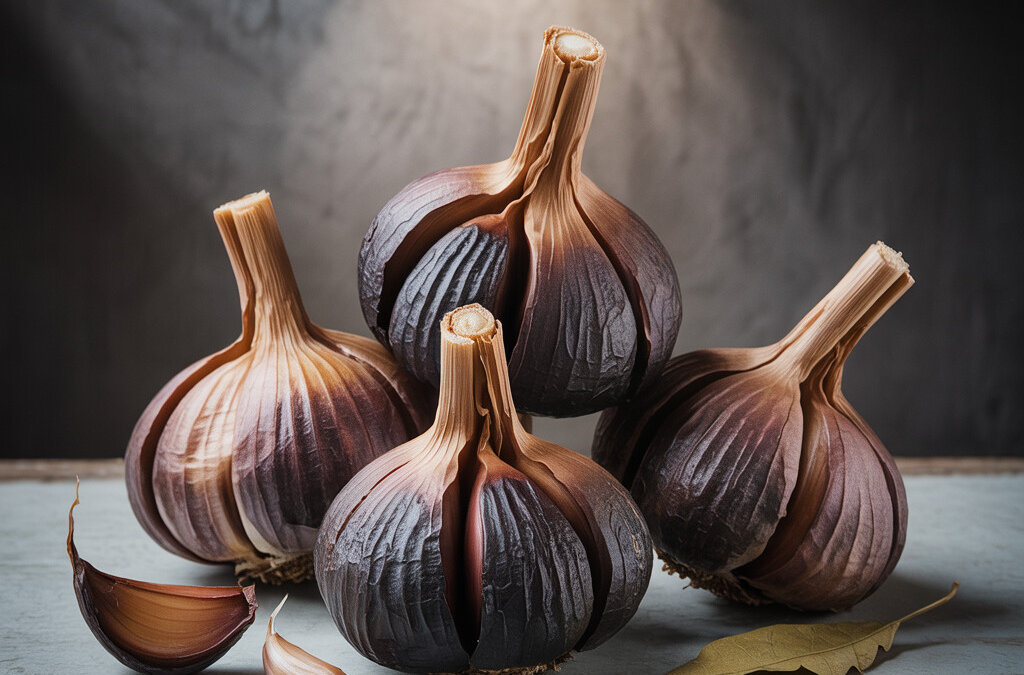
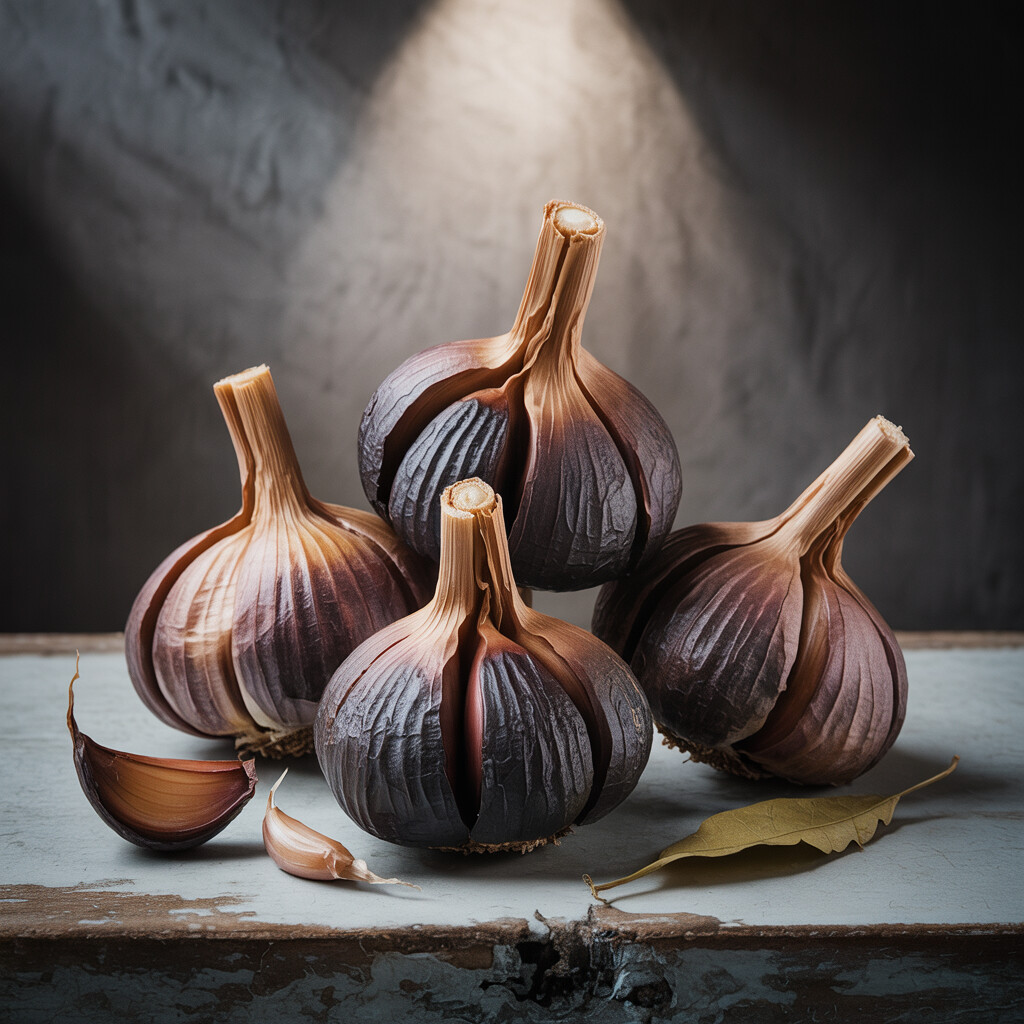
Garlic bulbs turn out too dry and crunchy? Sometimes it feels like you fried your garlic by mistake. This dryness usually comes from high temperatures, low humidity or both. Black garlic likes things hot but not too hot: aim for a cozy environment between 140°F and 170°F with some moisture in the air. I once got a batch so hard I considered using it as maracas.
Other times, people get inconsistent color. Some cloves look beautifully black, yet others are pale brown or even weirdly spotty. This uneven color is often because there isn’t enough airflow or humidity in your fermenting environment. Crowding the garlic or stacking it often creates stubborn, patchy results.
Let’s not forget about odors. If you’re met with a funky, “are you making cheese?” smell pouring out of your rice cooker or slow cooker, don’t panic. Serious black garlic production has a way of turning kitchens into temporary flavor factories. Overpowering smells often hint at improper sealing or too much air leakage, letting the full funk escape before the garlic has settled into its sweet, mellow flavor.
Of course, some home cooks simply notice their garlic refuses to transform. If your batch stays harsh or pale, underheating or too-dry conditions might be to blame. Luckily, this slow transformation can be rescued by dialling in the balance of warmth, humidity, and patience.
The good news? Each snag has its own fix. If you’re set on troubleshooting black garlic making, identifying these common causes is the first step. Like any new kitchen adventure, patience and tinkering get you over the learning curve. Next up: proven strategies for troubleshooting black garlic making, so you spend less time Googling fixes and more time savoring your savory-sweet reward.
Troubleshooting Black Garlic Making: Tips for Success
So you’ve started making black garlic at home, but things just don’t seem right. Maybe the cloves are hard. Maybe your house smells strongly of garlic, a superhero loss if you love vampires, but a problem otherwise. If you’ve found yourself stuck with strange textures or weird colors, don’t worry! Here’s where Troubleshooting Black Garlic Making comes to the rescue.
Most Black Garlic Issues come from trying to control three things: temperature, humidity, and time. It isn’t tough science, but it sure does get touchy! Too little humidity? You’ll get tough, dried-out cloves. Too cool or short a time? You’ll get pale spots or a weird layer over some of your garlic. Too warm or too long? Hello, burnt-tasting, hard-to-like clumps.
Practical Basics for Troubleshooting Your Black Garlic Adventure
Knowing where trouble starts can save you a massive headache later. Here are hints, solutions, and ways to stay sane as your garlic quietly transforms overnight:
Stick to a consistent temperature around 140 to 160 degrees Fahrenheit and keep the units small inside (avoid stacking!). If you see hard cloves, try a second run with more humidity. Use rice cookers or fermentation boxes but place a bowl of water beside to raise air moisture. Covering in foil helps.
Troubleshooting Black Garlic Making mixes science with a bit of trial—and naturally, error. But the flavor fireworks at the end? So worth it, even if you have to light a match or two. If you’re still curious, here’s a big-picture resource: check out How To Make Black Garlic At Home A Simple Guide. Happy kitchen experimenting!
Preventing Dry or Hard Black Garlic
How Humidity and Heat Affect Garlic Texture
Moisture, as you might guess, is at the heart of trouble when troubleshooting black garlic making problems like dryness. That slow magic happens when bulbs sweat and transform in a warm, damp space. If the air is too dry, the cloves seal themselves off, getting tough before the sugars can work their caramel tricks. Too much humidity and things get soupy fast—or worse, moldy. Goldilocks would hate those ends of the spectrum.
Dial in the right humidity and temp. Target a humidity between 70 to 80 percent. Think “tropical, but not Amazon rainforest.” Use a sealed rice cooker with a water cup tucked along the side, swap out towels for moisture every four days, or try a clamped proofer standing vigil on your fermentation temple. Monitor. Adjust. Obsess a little. If air feels desert-fresh, your bulbs will beg for a spritz every morning. Too muggy, and you’ll know to crack the lid or trade water for dry.
Freshness counts. A garlic bulb left in the crisper for two weeks—funny how things get forgotten down there—has little sap left to ferment with. Grocery store bulbs are treated for shelf life, so source the freshest, juiciest garlic you can. Winter garlic from farmers’ markets is ideal. Stock up, leave the garlic wrapped and whole until the day you’re ready to start your black garlic journey.
If you see these classic mistakes as you troubleshoot black garlic making, take heart. With practice and a dash of garlic wisdom, your next batch will cross the finish line dark, shiny, and soft as warm fudge.
Addressing Uneven Coloration in Black Garlic
If you’re staring down a tray of garlic bulbs that look more like a patchy Halloween mask than midnight magic, don’t worry. Uneven color is a common hiccup in the black garlic journey. The slow-and-steady “fermentation” process should leave you with tender, umami-packed bulbs, but sometimes you’ll find spots that are paler, brown instead of black, or just a little…wonky. Grab a flashlight and your sense of curiosity. Troubleshooting Black Garlic Making starts right here, with a close inspection.
Even Cooking Tips for Black Garlic Appearance
Black garlic’s perfect color means you’ve nailed both the method and the conditions. Variations in color usually mean something disrupted a smooth ride from raw to black—either heat, humidity, or airflow was off. Did bulbs touch each other or the sides of your slow cooker? Did some bits peek out from their foil wrappers? These spots can dry out or cook faster than others, like that overachieving corner of bread in my toaster. Plus, opening your rice cooker a little too much can let out heat or moisture, causing chaos on the color front.
For smoother-looking results, start your next batch with a few swipes at these classic trouble zones: always wrap bulbs in foil, but don’t squeeze them too tight. Give each bulb enough space for good airflow. Set them on a rack if possible, rather than crowded at the bottom. If your slow cooker or rice cooker is on the fritz (those hot spots are no joke), try rotating the cloves midway or use a more reliable device. Patience matters, too—it’s tempting to keep peeking, but opening the lid resets the slow-cooking saga. Troubleshooting Black Garlic Making sometimes means letting things run undisturbed for a few extra days.
Keep these lessons tucked away. Black garlic looks fancy, but you don’t need a science lab to avoid odd patches. Trust me, a little planning smooths out just about any uneven edge—on garlic, or on life. Now, onto the next mystery in the kitchen!
Managing Overpowering Odors During Black Garlic Production
Raise your hand if you’ve ever worried the whole house might start to smell like an Italian deli thanks to your black garlic experiment. You’re not alone. One of the flashiest problems when making black garlic at home is the remember-me-for-days aroma—think sweet, tangy funk with a hint of mystery—that seems to coat every room. Troubleshooting Black Garlic Making often starts with getting these odors under control, because if we can smell it, so can the rest of the neighborhood.
Keeping Odors in Check While Making Black Garlic
The key to preventing overpowering odors lies in the container. Choose a rice cooker or a fermenting bag with a tight-fitting lid. Even a slow cooker with heavy plastic wrap sealed at the edges with a rubber band can do the trick. Make sure whatever you use is safe for long, low-temp cooking and can handle a multi-week project. Nestling the cooker inside a snug cardboard box will add a buffer between your stinky science and the rest of the house.
Good ventilation is next. A dedicated garage, porch, or outbuilding is perfect if you’re worried about the smell. If that’s out of reach, an open window and a countertop far from heavy traffic works. Plug-in fans pointed toward a vent, window, or kitchen exhaust can pull aromas outside fast, especially in warmer months. Open a box of baking soda in the room, or swap in a bowl of white vinegar; both absorb odors before they settle.
If your garlic batch still draws protests from pets, kids, or the HOA, set up buffers like activated charcoal bags, HVAC filters, or air-purifying plants nearby. Most important: never unplug or open your container until your cycle finishes. If you pull a clove out to peek, steam (and with it, scent) will rush out fast. Troubleshooting Black Garlic Making often starts with patience. Mourning a lost pizza night is easier than living in a garlic cloud for weeks.
Once your batch is done, let it cool, or set your carefully chosen vessel outside to breathe before opening. I usually open up my rice cooker on the porch to save my living room from getting splashed with rich balsamic steam. If your family has ever questioned your choices in mid-winter, you know how strong those first wafts can be. With these Black Garlic Troubleshooting Tips tackled at the start, you’ll enjoy age-old umami flavor any time without being haunted by last weekend’s project.
Ensuring Proper Fermentation Conditions for Black Garlic
Perfect black garlic is a bit like the Goldilocks of kitchen projects. Your conditions need to be just right for that magic mix of sweet, earthy, and umami flavors. If you have ever cut into a batch only to find it dry, mushy, or oddly gray inside, you understand why mastering the fermentation process matters so much. Gratifying as it is, troubleshooting black garlic making takes patience and a little bit of science.
Creating the Best Home Fermentation Environment for Garlic
Temperature control is crucial. Your garlic needs warmth and consistency, usually between 140 and 170 degrees Fahrenheit. I like to use a rice cooker with a keep-warm function or a dehydrator. These appliances hold a steady heat, taking the guesswork out of fermentation. Go much hotter than that and your cloves may dry out, bake, or develop off-putting notes. Dip below that range and you run into riskier territory: spoilage or not-so-black bulbs. If you want to dig deeper on fermentation, you can read our simple guide to the black garlic fermentation process.
Moisture also plays a star role. Too dry and you will get brittle, flavorless cloves. Too wet and your bulbs could sour, which no amount of positive thinking can save. Most folks find a couple of layers of cheesecloth, foil, or even a tightly closed rice cooker bowl go a long way in balancing airflow and moisture retention.
One surefire troubleshooting black garlic making tip stands out: Don’t rush it! If you check your garlic after a week or even two, you will likely find bits that are still pale, sticky, or sharp. Give your bulbs at least three weeks, checking at the end for that sticky-fudgy sweet spot.
I never get tired of the moment when those caramel-colored streaks turn completely black inside boiled eggs, on creamy cheeses, or in a savory sauce. Control your environment, have patience, and keep a keen nose (avoid the funk of damp or rotten garlic) and you will always have the edge in troubleshooting black garlic making at home.
Storing Black Garlic to Maintain Quality
Got some homemade black garlic? Lucky you! The trick is now to store it right so all your time, energy, and that sticky-sweet flavor do not go to waste. Learning how to keep your allium in top shape is just another part of Troubleshooting Black Garlic Making. A few simple steps will keep it soft, rich, and bursting with that umami punch, no matter if you use a little at a time or put it on everything. Let us talk about sealing in the good stuff and keeping away the mistakes home cooks run into.
Preserving Homemade Black Garlic for Optimal Freshness
Take a look at your finished cloves; let them cool to room temperature, then store in an airtight glass lock-top container. I keep mine in the back corner of the fridge where I will not forget it completely, or pop it in the freezer (again, sealed tight) if I have the urge to make a huge batch. Both options halt the fermentation and keep mold and strange flavors away. Room temperature can work for a little while, especially in a jar with a tight lid, but only if you go through it quickly, as in within two weeks. Black garlic does not love plastics unless you know your fridge is safe from flooding food odors.
Here is a quick sign your black garlic needs more troubleshooting: if it develops fuzzy white spots, sourness, or a sharp edge you did not notice before, the batch has likely turned. Toss out the questionable and come back stronger, cleaner, and savvier next round. If it is just hard or dry (hello, overcooked batch), turn those cloves into black garlic salt or a Japanese-style tare sauce so nothing is wasted.
Proper black garlic needs as much TLC after you nurse it into being as it does in the rice cooker or slow-cook oven. When homemade supply is hard to come by, it is extra important to save and savor every bite. Store your batch well, undercover like treasure, and you will have sticky-sweet garlic for sauces, sides, salads, anywhere you want its smoky molasses taste. Keep bowing down to the patience this food takes, and snag back flavor and value that rookie setups threaten to lose, with these key Troubleshooting Black Garlic Making tips.
Creative Culinary Uses for Black Garlic
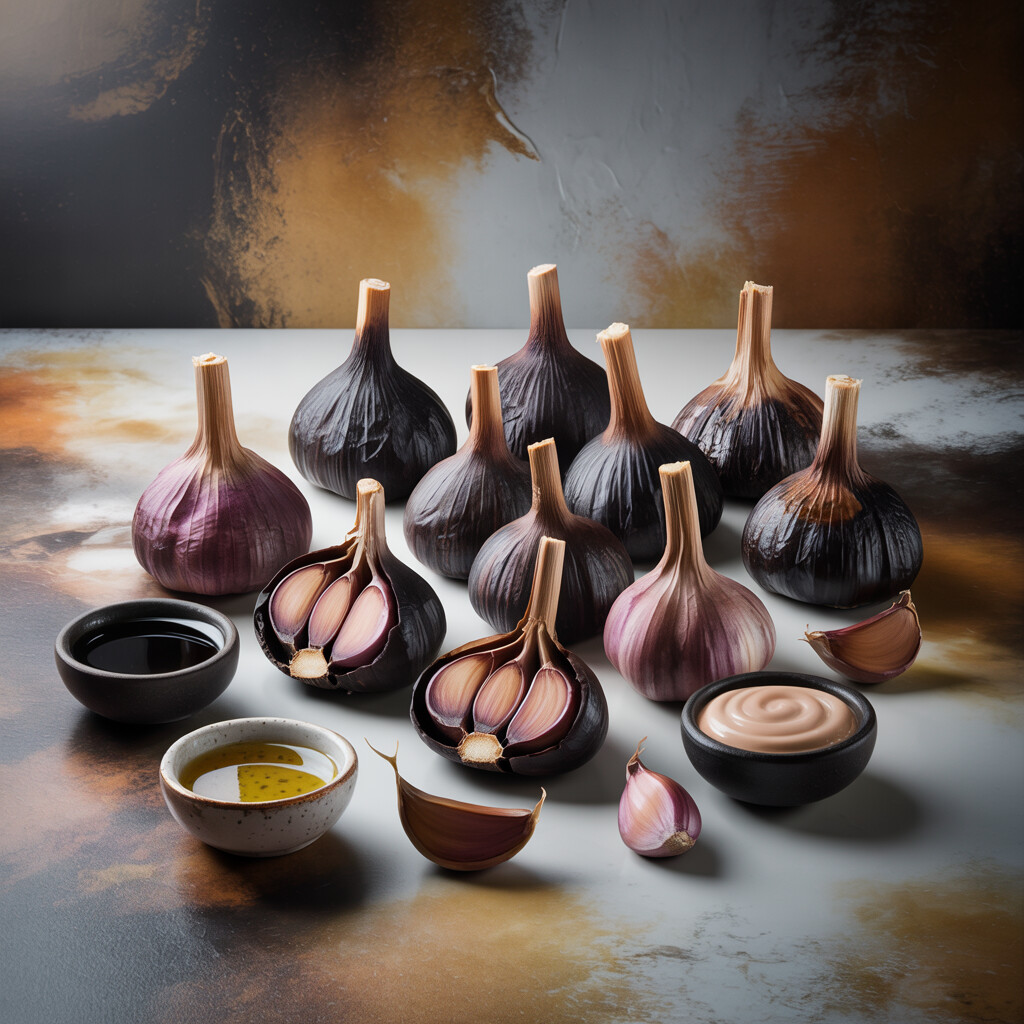
If you have reached this point and survived Troubleshooting Black Garlic Making, celebrate! Now you get to enjoy your success. Black garlic is like magic in the kitchen. Creamy, complex, sweet, a little tangy—it can give every recipe a twist of deep umami. Take your finished cloves and let your creative juices flow.
Unleashing Black Garlic’s Culinary Potential
Spread whole cloves on warm toasted bread or crackers. I sometimes mash pieces along with regular butter, making the best-ever bread spread. Finely mince black garlic into a vinaigrette or sweeten simple aioli. For adventurous types, whip some into mashed potatoes, risotto, pasta, or rice pilafs for layers of flavor and a beautiful dark fleck.
If you make your own pizza crust, try small bits of black garlic dotted on top with roasted veggies. Some sneak it into barbecue or teriyaki sauces, homemade ketchup, or even peanut butter and jelly for a new kick. Want a sweet idea? Mix little bits into dark chocolate truffles or use it instead of vanilla extract with caramel or butterscotch sauces. Invite neighbors to try it on cheeseboards with sharp cheese or gli dill pickles—it is always a conversation starter.
You worked hard Troubleshooting Black Garlic Making, and results this good deserve to be enjoyed. Missing all those heads? Now you get why good black garlic can be hard to find locally! The payoff: what you make at home tastes fresher and more complex than expensive store-bought versions. On your next batch, try different garlic types or slightly less-fermented cloves for a tangier flavor.
If you want to dig deeper into flavors and ideas, check out more on Black Garlic Culinary Uses Elevate Your Dishes for some next-level inspiration. You have earned your place in the world of black garlic making!
Conclusion
You do not have to settle for store-bought black garlic when your own DIY version can be even better with a little patience and some smart troubleshooting black garlic making. After reading tips on common issues and mastering proper fermentation conditions, you are ready to tackle black garlic making problems head-on. No need to feel lost among dried-out bulbs or wild aromas—I have been there and know the struggle is a rite of passage.
Remember, any hiccup is just a signal to adjust and try again. Bring out that garlicky alchemy, whether you are saving cloves for dishes or just can not wait to serve them up warm from the rice cooker! Shine a little confidence into your kitchen. Then get ready to share that savory shortcut to flavor gold. The world deserves your black garlic everything.
FAQ
Why is my black garlic dry or tough?
You may notice your black garlic turning out dry, almost chewy, rather than lush and sticky. Troubleshooting black garlic making often comes down to the environment. When making black garlic at home, make sure your slow cooker or rice cooker seals the container well. If too much moisture escapes, you will miss out on that fudgy texture everyone raves about. When I left the lid open a hair for extra airflow, my bulb came out nearly rock-hard—I learned to back off and let things steam in their own juices next try.
What causes uneven color in my black garlic?
If your black garlic isn’t that highly sought-after ebony color and you see streaks, you’re not alone. Troubleshooting black garlic making includes keeping temperature and humidity just right, and flipping the garlic halfway. Your garlic could look splotchy if some cloves are exposed to more heat or less moisture than others. For me, once I learned to rotate bulbs every week or so (and abandoned the old “top shelf, bottom shelf” attempt), my batch came out dark and glossy every time.
How do I minimize strong garlic odor during fermentation?
Nothing smells quite like black garlic in process. Every wall, every rug, every T-shirt you own might start to reek like a Mediterranean diner after a rush. Troubleshooting black garlic making for odor requires some strategy. Place your slow cooker or fermenter in a well-ventilated or outdoor space, cracking open a kitchen window (or even plugging in on the porch) to ensure your home is fresher when friends stop by. I learned to pick a nice weather week so I could hide the pot away from my tiny apartment’s main room—neighbors started asking where the invisible pizza place was.
Why are my cloves still white after weeks?
If, after waiting the full span you find your cloves are blonde when they should resemble licorice, stick with troubleshooting black garlic making by raising the ferment temp a little and inspect the seal. Right conditions (about 160 to 175 degrees Fahrenheit at near-100 percent humidity) yield jet black cloves. On my first try, my anxiety got me checking the crock like clockwork, causing temperature swings and white spots, so once I chilled out and trusted the process, everything came out midnight-dark next round.
How can I store black garlic and keep it fresh?
After weeks of effort, you want your black garlic to keep its sour-sweet flavor and inky look for the long haul. Troubleshooting black garlic making for storage involves a simple move: cool, airtight containers. Toss in a paper towel if you see condensation. Cloves can chill in the fridge for months or even freeze for up to a year, but make sure each is dry to the touch. My friend mailed me her first batch—ambitiously all loose in a sandwich bag. Her fridge smelled wild until she placed the bulbs in an empty jam jar. Every time she opens it now, that whiff takes her right back to black garlic science class.