

Regular Garlic Cultivation: Essential Tips
Did you know that Americans gobble up almost two pounds of garlic per person each year? That’s a whole lot of flavor. And if you’ve ever wondered how garlic goes from seed to savory superstar, you’re in the right spot. Regular garlic cultivation is a blend of patience, science, and a good old-fashioned love of digging in the dirt. I spent last weekend poking around my tiny backyard plot and trust me, the thrill of pulling up a plump, pungent bulb after months of gentle tending is pure garden magic.
Jumping into regular garlic cultivation doesn’t take much: just a patch of ground, quality seed bulbs, and a few simple tricks. Get those pieces tuned up and you’re well on your way to a bumper harvest the whole neighborhood might envy. We’ll even look at black garlic and regular garlic—a head-to-head match-up you won’t want to miss. Ready to dive in?
Understanding Black Garlic and Regular Garlic
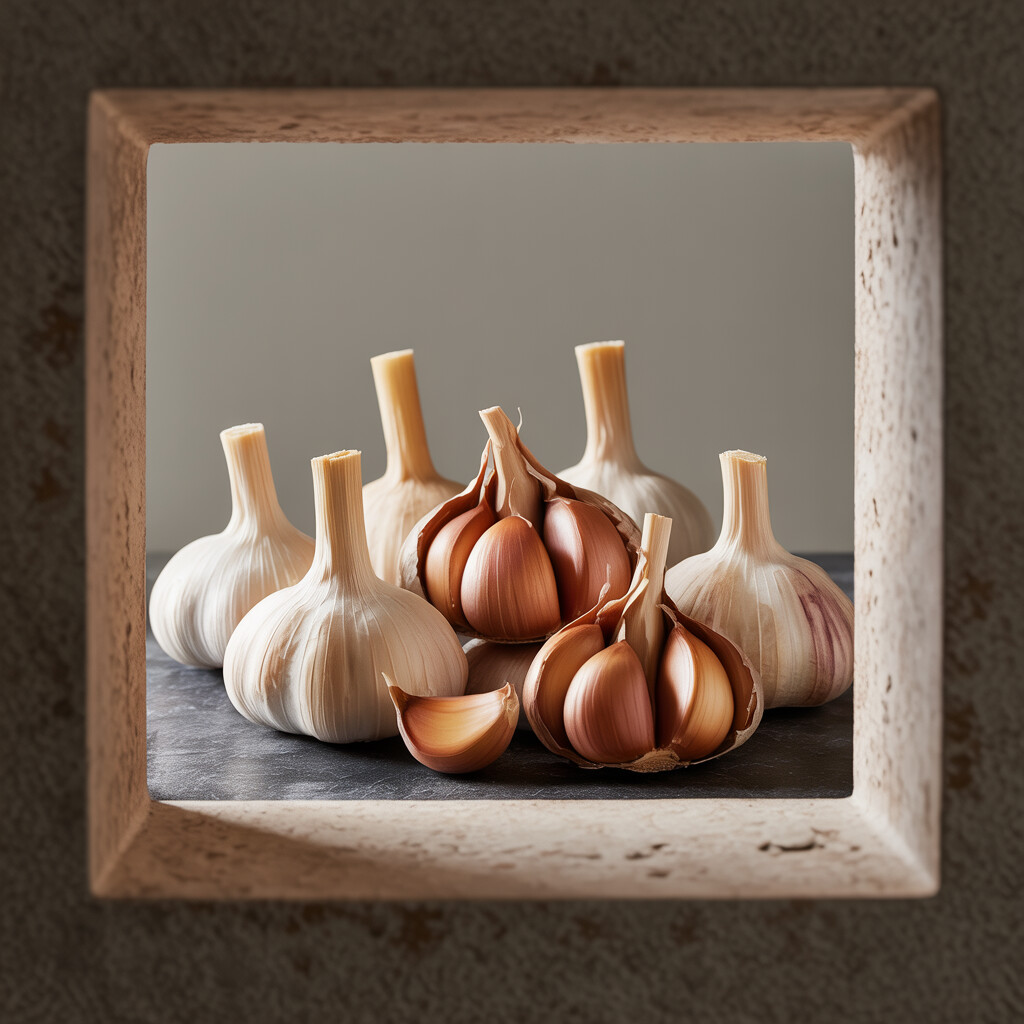
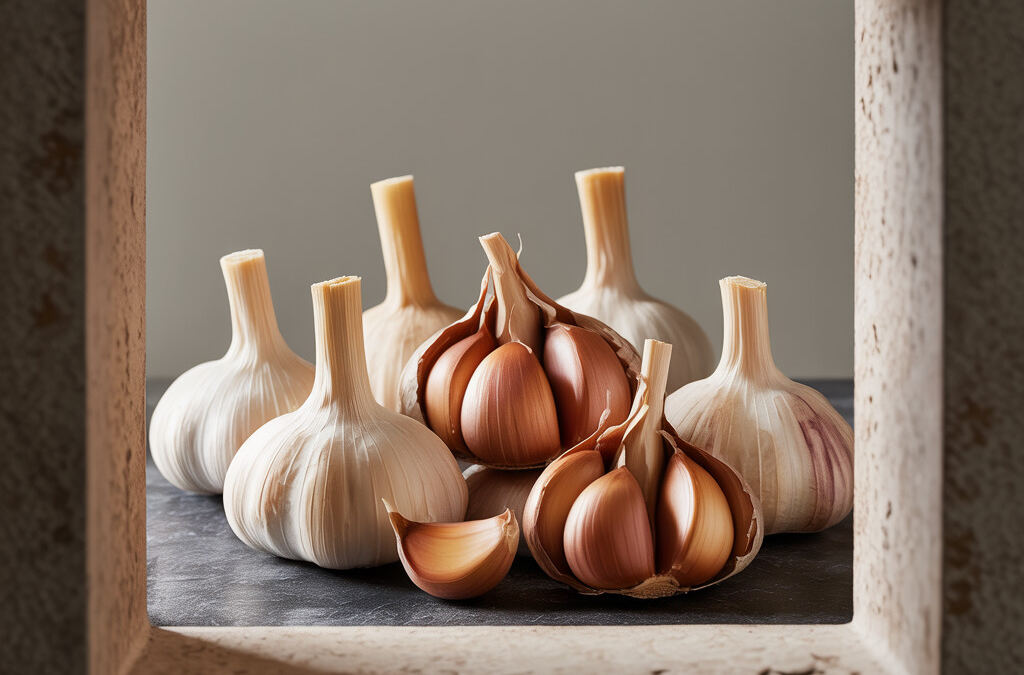
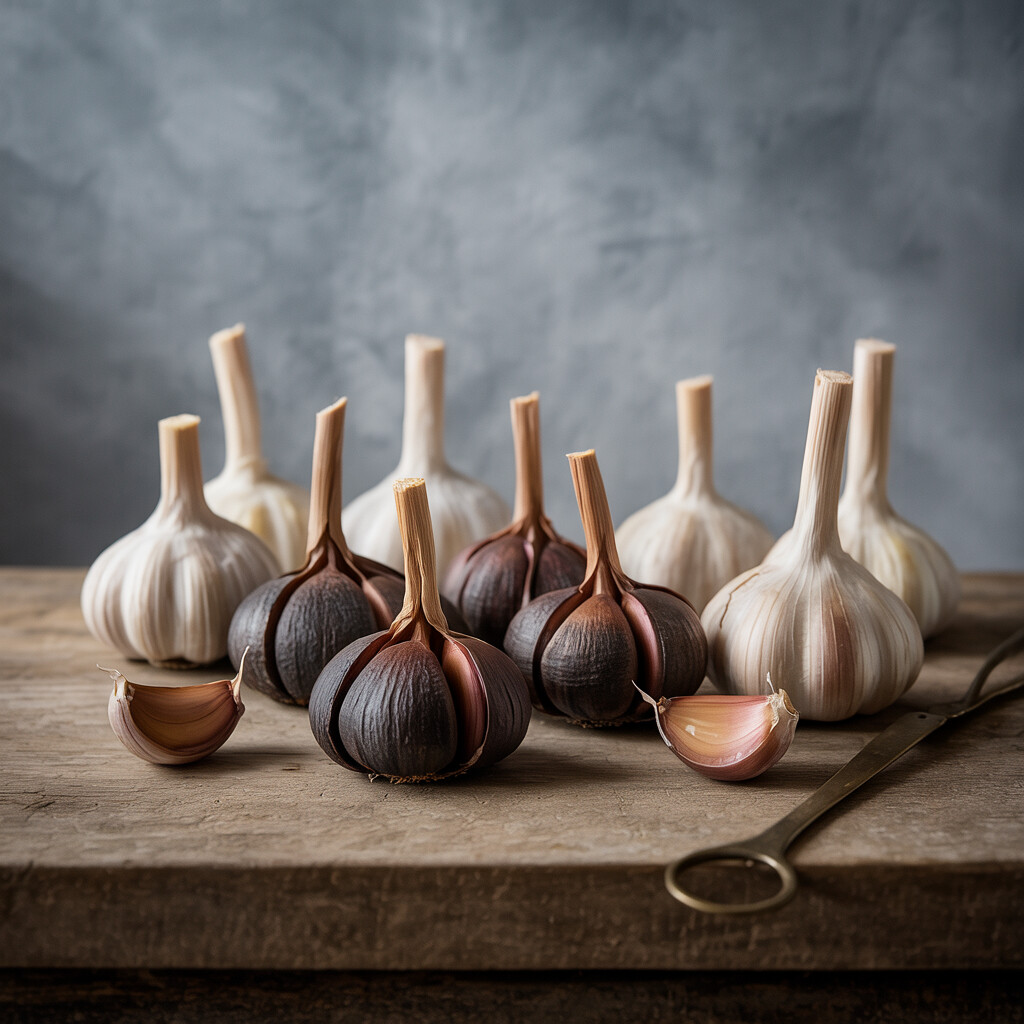
Black garlic and regular garlic may look and taste different, but their family tree is the same. They both come from the allium genus and deserve plenty of space in your kitchen. Black garlic steals the spotlight with its mysterious, dark color and subtle, mellow sweetness. Regular garlic is that trusty, fiery root you find in every grocery store—a bold player in any dish that calls for a punchy, garlicky aroma.
Regular garlic grows big and spicy bulbs right out of the dirt. After harvesting and cleaning, it is good to go for recipes as soon as it is cured or dried. With regular garlic, you can sauté, roast, or smash fresh cloves to give each meal a signature flavor. Cooking with raw garlic also means you get those health-promoting sulfur compounds—no fancy fermentation required.
Black garlic sweetness is created by a slow process: you gently heat whole bulbs for weeks with just the right amount of humidity. During that time, sugars and amino acids in the regular garlic turn into a black, jammy, sweet-savory treat called black garlic through something called the Maillard reaction. Black garlic bends the rules you think garlic follows; it tastes almost like a sticky, rich balsamic but never lets go of that special garlic earthiness.
How Regular Garlic Grows: Cultivation Basics
Regular garlic cultivation combines skill and a little patience. Becoming a garlic grower requires fertile, draining soil, a spot of sun, and timely planting in the fall. The bulbs slowly develop under winter’s blanket, then burst upward when spring sun returns. Conditions for regular garlic are not complicated; a dedicated gardener or even a curious home chef can bring a bounty of fresh bulbs from garden bed to kitchen. Many people are surprised that regular garlic cultivation can happen right there in their backyard, window box, or community garden plot.
Can you use any old garlic bulb to start your own garden? You can try, but you are better off picking top, disease-free bulbs from last season’s harvest or buying healthy seed garlic from a reputable source. Not every store-bought bulb—often treated to prevent sprouting—will give you full, healthy cloves next season.
If you find black garlic’s sweet-fermented magic a little hard to come by in stores, growing your own regular garlic gives you a straight path to fresh, healthy bulbs. That’s the baseline ingredient you need for making your own black garlic—once you fall under its flavor spell, you will want to try it in roasted veggies, stir fries, sauces, and even as a heartwarming dessert topping.
The Production Process: From Regular Garlic to Black Garlic
Turning regular garlic into black garlic is all about patience, heat, and a bit of humidity. Regular garlic, cultivated with basic planting techniques and healthy soil, starts off as the same pungent bulbs you find at farmers markets or tucked into supermarket produce bins. Once it matures through regular garlic harvesting time, this little clove is in for quite a transformation.
The Art of Turning Garlic Bulbs into Black Gold
Black garlic happens when whole bulbs are heated for weeks in a controlled environment. Picture a rice cooker gently humming in the corner. Low heat, about 140 to 190 F, makes sugar and amino acids in the garlic mingle in what food science calls the Maillard reaction. If you have ever taken a bite of a toasted marshmallow, you get the idea.
Over about three to four weeks, regular garlic becomes soft, earthy, and—most important—black. It develops sweet notes and tang without turning bitter. The biggest twist? No actual carbonization, smoking, or added flavors are needed. Time and a gentle sauna work their magic.
You do not need a fancy fermentation chamber to try making black garlic at home. Some people use slow cookers or even sous vide setups. Just go low and slow, avoid peeking, and check your humidity so things do not dry out. That said, getting your hands on premium bulbs is half the battle, and paying attention to regular garlic cultivation and harvesting gets you the raw product you need.
If sourcing great black garlic is tough in your area, making your own lets you pack your pantry with next-level flavor while using every bulb you grow or buy. Later, in your kitchen, black garlic unlocks a whole new world that regular garlic could never dream up. Let’s dig deeper into that irresistible taste and what sets black garlic apart.
Flavor Profiles: Comparing Black Garlic and Regular Garlic
Let’s look at what makes black garlic stand out from its regular cousin. The most obvious difference is taste. Picture regular garlic, raw and sharp. You get that punch of flavor on your tastebuds. It clears your sinuses and tells everyone in the room you just ate it. Black garlic is gentler. It cozies up to flavors with a mellow flavor profile: a little sweet, notes of dark fruit, and that deep umami taste you usually find in soy sauce or roasted mushrooms. If you slow-cooked garlic with balsamic and figs, you’d land somewhere close to black garlic.
Black Garlic and Regular Garlic: A Side-by-Side Flavors and Texture Guide
Many of us are used to regular garlic. Home cooks know the tricks: throw minced garlic in a hot pan or finely chop it for sauces. Using regular garlic rewards careful technique. Proper regular garlic cultivation has the potential to produce big, juicy cloves with a comforting depth when cooked, yet its solid crunch and sharp bite make it a bit intimidating to throw in raw. Black garlic, on the other hand, needs only a spoon. Spread it on bread or drop it into a risotto to add that something special. No need to chop or even bite it—just squish and swirl.
If you grew up on regular garlic, trying black garlic for the first time might change the way you cook. The mellowed tang means you can drop whole cloves into vinaigrettes or pasta dishes. Try black garlic in a Caesar dressing for a new twist. Next time you see black garlic in the store or online, remember: it started out in the soil like the garlic in your favorite salsa—the difference is just time, warmth, and a bit of patience. Regular garlic cultivation yields those reliable bulbs. Only through a slow, careful aging process does it become the sweet intensity of black garlic, ready to transform your favorite dish.
Health Benefits: Black Garlic vs. Regular Garlic
If you have ever eaten roasted garlic and loved how sweet it gets, black garlic will feel like the holy grail of savory goodness. So, is eating it actually better for your health, or is that just a kitchen legend? Both regular garlic and black garlic deliver plenty of nutritional benefits, but their superpowers do vary. A quick heads up before diving too deep: You might feel frustrated if you cannot find black garlic everywhere, but don’t worry. You still get plenty of the perks with regular garlic if you know how to unlock them.
Black Garlic’s Unique Nutritional Benefits
Fermenting garlic turns it into black garlic, bringing out double the antioxidant content of the raw stuff. These antioxidants help combat damage caused by free radicals (which is a fancy way to say they protect our bodies from the usual wear and tear of daily life). Black garlic is also high in S-allylcysteine, a compound known to make heart health stronger and to help reduce cholesterol. Keep in mind, though, that it is lower in allicin—the bold compound that gives fresh garlic its classic pungency and many of its cutting-edge health benefits. If you prefer a smoother, gentler flavor with benefits that last a bit longer, black garlic is your guy.
Regular garlic is still a powerhouse. Even though cooking or aging does reduce the allicin content, it still helps fight infections, strengthens the immune system, boosts heart health, and reduces inflammation.
If you get serious and begin to master regular garlic cultivation, you can harvest your cloves with the exact balance of nutrients you want by popping them out of the ground at different stages—from zingy green scapes to fully mature heads.
Your region’s soil and climate will also have some say in the makeup of the garlic you grow. If you give regular garlic a long, cold winter and soil that drains well, you will unlock even more nutrients when spring rolls around. Mastering these tricks during regular garlic cultivation means you always have a way to link delicious meals to your health.
Rumors aside, any type of garlic offers one of the most approachable, tastiest plant-based nutrition boosts out there. Even if you have trouble sourcing black garlic, ramping up how much garlic you grow at home is a good, cost-effective second prize. Once you practice planting the right variety in healthy soil and with good timing, you set yourself up for big batches of black garlic and a healthy routine whenever you want.
Regular Garlic Cultivation: Planting Techniques and Soil Requirements
Regular Garlic Cultivation is more than just sticking cloves in the dirt and crossing your fingers. If you have thought about growing your own but felt a little nervous, let me assure you it is easier than you might think. Plus, nothing smells quite as magical as fresh garlic roasting away in your own kitchen.
Garlic loves a sunny spot with soil that drains well. I usually check my yard for puddles after it rains. The places where water disappears quickly are best. Before planting, loosen up that dirt and mix in some compost. It makes for happy bulbs later on. Make sure to break apart each head into single cloves. Plant each clove about two inches deep, pointy side up, and six inches apart in rows. It is tempting to crowd them, but give them their space to plump up those heads.
Soil Prep and Maintenance: Unlock Bumper Garlic Harvests
Regular Garlic Cultivation does not require fancy equipment, but a little attention goes a long way. Keep the soil moist, but not soaking wet. The roots appreciate a drink, but soggy soil invites rot—which nobody wants. Mulching is one of my favorite tricks. If you cover everything with a fluffy layer of straw after planting, it keeps the dirt cool and stops weeds from taking over your garlic patch. As spring rolls around, sprinkle a little fertilizer for a boost.
Whether you want to eat it fresh or turn it into something special like black garlic, starting with high-quality bulbs changes everything. Garlic pulled from your backyard feels and tastes different than what you find at most stores. Even folks without green thumbs can succeed with these Regular Garlic Planting Techniques and give themselves an edge in the kitchen, especially if you have ever struggled to find good black garlic at the store.
Regular Garlic Harvesting Time: When and How to Harvest
Timing your garlic harvest just right is kind of like waiting for a perfect cup of coffee to brew. Too soon, and it is watery, but wait too long, and it starts to taste bitter. In the world of Regular Garlic Cultivation, knowing when to pull up your bulbs can mean the difference between plump, flavorful cloves or a batch of shrunken, splitting bulbs that roast up dry.
Key Signs Your Regular Garlic Is Ready to Harvest
Now, if you are wondering—how do you know it is time? First, stop watering your garlic about two weeks before you plan to harvest. This helps the skins around the bulbs dry a bit, making them last longer when stored. It is all in the leaves. Watch as they start to turn from green to brown, dying off from the bottom up. You will want to harvest when about half to two-thirds of the leaves have browned, but the stems are still upright and sturdy. If you wait until all the leaves are brown and crispy, your cloves might have split their skins, which means they will not store as long. That is your cue.
To actually harvest, insert a garden fork or small shovel into the soil beside the bulb (not through it) and gently pry it up. Never just yank using the leaves, or you will probably snap them and bruise or even rip apart your bulb.
Alright, so you have these freshly unearthed bulbs. Do not forget: Curiosity may push you to brush dirt off with your hands, but resist the urge to wash the bulbs. Instead, gently knock off most of the soil and lay the bulbs out—stems and all—in a shady, ventilated area. Some folks hang them, while others spread them out on screens. Either way works as long as the bulbs get plenty of air around them for two to three weeks. When the roots and outside wrappers are nice and dry, snip off the roots, trim the stems to a couple inches, and your regular garlic is good to store for months.
Whether you grow to eat as-is or plan a flavor adventure and want to later ferment your bulbs for black garlic, being familiar with Regular Garlic Cultivation from planting to harvest helps you enjoy garlic your way, any time of year. With a bit of patience and the right timing, even small home gardens or raised beds can yield enough fat bulbs to offer raw dishes that crisp punch of pungency, or dark caramel sweet notes for folks who skip the conventional and opt for homemade black garlic.
Culinary Uses: Incorporating Black Garlic and Regular Garlic into Your Cooking
Let’s dive into my favorite part: cooking. You have probably already dreamed up dozens of dishes after hearing about the deep flavors of black garlic and the versatile bite of regular garlic. Black garlic has a complex, sweet-and-savory kick along with hints of balsamic and tamarind. Regular garlic comes in strong with unmistakable sharpness that softens and sweetens when roasted.
Black garlic can be used by simply mashing a few cloves into dressings, sauces, and pastas. I love adding minced black garlic to butter for a next-level steak topper or whisked into Asian dipping sauce. Since it is sweet and mellow, people often use it as a secret ingredient in aioli, risotto, and even chocolate brownies. Don’t be surprised if friends are wowed by that strange umami pop.
On the flip side, regular garlic is part of just about every savory dish in my house: garlic bread, shrimp scampi, tomato sauces, dips… the world is your clove. If you have taken the plunge yourself with regular garlic cultivation, you are bound to use this ingredient at least every other meal because of its robust flavor and incredible shelf life. A knob of gently smashed garlic grilled with olive oil and crusty bread is all summer afternoons at grandma’s house.
Creative Ways to Use Both Kinds of Garlic in Your Recipes
Try sprinkling black garlic across homemade pizza for a gourmet twist or swirling it through hummus. Say you made the mistake of planting four times as much hardneck garlic as you need. If you want to cross things up, blend cooked-down regular garlic with raw black garlic paste to slather across, say, roast chicken. Here is the kicker: since black garlic is fairly rare in supermarkets, you can experiment with making your own at home by aging properly stored bulbs from your last regular garlic cultivation.
What you might lack in quantity or access to aged black garlic, you can make up for with plenty of the regular stuff using tried-and-true regular garlic cultivation, proper planting, and a little patience. Just remember, whatever kind of garlic you use, cut back on salt in your recipes, since both types add a lot of depth and could send dishes past the point of flavorful. Your future self will thank you at the table.
Availability and Cost: Sourcing Black Garlic and Regular Garlic
Need garlic in your life? You are not alone. While whole heads of regular garlic pop up everywhere from the local Winn-Dixie to affordable neighborhood farm stands, black garlic does not spill out of every grocery basket. But the challenge of finding a stash worthy of your charcuterie boards has a silver lining. The journey often brings even more creative ideas for your kitchen.
Sourcing Black Garlic and Exploring Costs
Let us break it down. Regular garlic grows all over the world, and U.S. demand stays hot because home chefs and pros trust it for everything from grilling to salad dressings. Prices bounce around based on location, time of year, and season. A basic bulb might cost as little as a single color run marker, yet it is always within reach. If you search for affordable regular garlic, focus on local farmers who value careful, hardy planting techniques and follow tried-and-true Regular Garlic Cultivation practices. Some variety names to watch: California Early, Music, and Russian Red.
Black garlic, by contrast, tends to cost you more. Grocery stores put up their “coming soon” signs, black foodies, and trendsetters dive into specialty food stores, dedicated online shops, or health markets. Why? The price difference usually shows up because black garlic spends three weeks (or longer) aging, not to mention expensive power bills and climate-controlled rooms.
Craft makers who value clean-growing methods and quality investments naturally pass on a higher cost. Sometimes you may even get skill-deserving price tags that approach $80 or more for ten ounces. That does not stop home cooks who love a challenge. As the black garlic trend grows, more people try to make it at home, keeping costs down and creativity up.
My rule of thumb: If the classic “what does black garlic taste like?” question inspires you, enjoy both. Use regular garlic for the fresh, punchy pop it brings to pizza, salads, or fried rice, while aging it to deepen the flavor spectrum in dishes like black garlic Caesar dressing. If your kitchen has been holding extra garage-party bulbs, try a little homegrown experiment by exploring traditional Regular Garlic Cultivation tips (like well-drained soil and long, cool winters), plus some clever black garlic tutorials. The reward may surprise you.
If you have a recipe in mind, try the “mix and match” plan. Source your reliable regular garlic from local markets and leave that as your foundation. Then blend in black garlic for bold, sticky, sweet-sour specialty bites. Remember: Teaching what you know is the best way to build more adventurous next-gen garlic buyers and blue-ribbon home chefs.
Storage and Shelf Life: Preserving Black Garlic and Regular Garlic
Storing garlic may seem simple, but there’s a bit of science behind keeping these flavorful bulbs at their tasty best. I always treat my black garlic stash like a tiny dragon’s treasure, nestled carefully in its own nook—especially since it’s a little trickier to get. Proper storage means less waste and more flavor whenever inspiration hits.
Keeping Garlic Fresh: Practical Storage Techniques
For black garlic, you want gentle care. Since black garlic loves moisture and can get sticky, store it in an airtight container in a cool spot, out of direct sunlight. I keep mine in a glass jar and hide it in the pantry, although some folks prefer the fridge. If you decide to chill black garlic, bring it to room temp before using for the best taste and texture. Good storage will keep it rich and sweet for up to six months. I admit, mine rarely makes it that long before I turn it into a pizza topping or a secret weapon in a vinaigrette.
Regular garlic has a more robust ego. Cure the bulbs by drying them in a warm, breezy space for a couple of weeks following Regular Garlic Cultivation, brushing off excess soil but leaving the papery skin intact. Once cured, store in mesh bags or ventilated baskets at room temperature, a bit above fifty degrees if you can manage it. Skip the humidity and avoid sealed containers, which risk mold and can ruin all your Regular Garlic Planting Techniques and soil preparation efforts.
Regular garlic retains its punch for a few months if it’s grown following smart Regular Garlic Cultivation practices. Sprouts might appear during longer storage; trim off any green bits and still use the clove in cooked dishes.
Once you’ve unlocked the flavors and magic of black garlic, you never want to waste it, so keeping good storage habits in mind is key. Seeing rows of premium bulbs in tidy jars—it’s a happy little thrill that celebrates all the work you put into that Regular Garlic Harvesting Time. Let your garlic play the long game and uncover delicious ways to use it no matter the season.
Conclusion
Now that you know the ins and outs of regular garlic cultivation and the extraordinary transformation to black garlic, you are set up to unlock even more kitchen inspiration. Even if you find yourself searching far and wide for black garlic, your hands-on knowledge about planting and harvesting regular garlic gives you the power to make delicious discoveries at home.
Full of flavor and nutritional value, black garlic deserves a starring role in your kitchen adventures. So why not take action now to share what you know and encourage others to try black garlic? Get creative with it and never stop experimenting, tasting, and sharing your love for this flavor-packed ingredient.
FAQ
What soil works best for regular garlic cultivation?
Regular garlic cultivation thrives in rich, well-draining soil. As you prepare to plant garlic, make sure the ground is loose and full of organic matter. Your cloves will sprout happiest in soil that isn’t too sandy or packed hard. If your garden tends to hold water, try mixing in compost or planting in raised beds. Keeping soil loose not only allows better root growth, it helps your garlic soak up nutrients and stay healthy through the season. In my own kitchen garden, I once made the mistake of ignoring compacted soil—harvest time left me with stubborn, stubby bulbs. Since fixing that patch, each clove has grown tall and plump, worth every patch of dirt under my nails.
When is the right time to plant regular garlic?
For top-notch regular garlic cultivation, you want to plant in the fall—after the first light frost but before your ground freezes solid. This way, cloves nestle in before winter’s chill, giving them a jump-start once spring hits. Your job is simply to push each clove about two inches deep, cover them, then let nature work its cold magic. If you live in a milder region, you could plant in early spring, though cloves size up a bit smaller. I’ve tucked cloves in on Halloween, then forgotten about them until those bright green shoots pop above the mulch by February. Nature’s buried treasure, just waiting for warm sun and steadfast patience.
How do I know when to harvest regular garlic?
Regular garlic harvesting time usually comes in early to mid-summer—watch your plant’s leaves for clues. You want to catch them when one or two bottom leaves yellow, but the top still looks green and perky. If you wait until the whole plant droops, you risk the cloves splitting apart underground. During regular garlic cultivation, I grab a garden fork and gently loosen each bulb before pulling them out. There’s nothing quite like the earthy aroma of just-harvested garlic wafting up on a sticky July morning—it’s the homegrown gold I wait for all year.
What basic care does regular garlic need as it grows?
Regular garlic cultivation asks that you keep things simple: water your plants regularly, remove weeds, and mulch for steady moisture and warmth. Too much water rots bulbs, while not enough leaves them puny. Garlic needs about an inch of water a week as it forms heads—less after rain spells, and more during hot dry spells. If your weather warms up too soon, cover the bed with a little straw to keep bulbs cool. Garlic is tough stuff but does need those steady basics from you, like checking for heavy pests and double-checking your rows don’t suffocate under weeds. Tending my own garlic every season strengthens my relationship with the dirt, and my risotto ends up that much richer for it.