

Black Garlic Preparation Methods: A Home Cook’s Guide
Ever tasted garlic that’s as sweet as caramel and as tangy as tamarind? That’s black garlic for you—a flavor bomb that started as a bit of a kitchen accident long ago, yet today stars in everything from salad dressings to chocolate truffles. You might be surprised to learn that 65% of people who try black garlic say they reach for it once a week or more, which just goes to show how this superfood can become your secret cooking weapon! Last weekend I opened a jar of homemade black garlic, and it sealed my jeans shut with the earthy, almost syrupy aroma curling up around me. Get ready. Your socks might just get knocked off.
If you’re curious to explore Black Garlic Preparation Methods and ever wondered if you can make black garlic at home, you’re in the right place. I’ll walk you through simple Black Garlic Preparation Methods even if you don’t have a specialty fermenter hiding in your cupboards. So, gather your courage (and some fresh garlic). Ready to dive in?
Understanding Black Garlic and Its Unique Flavor Profile
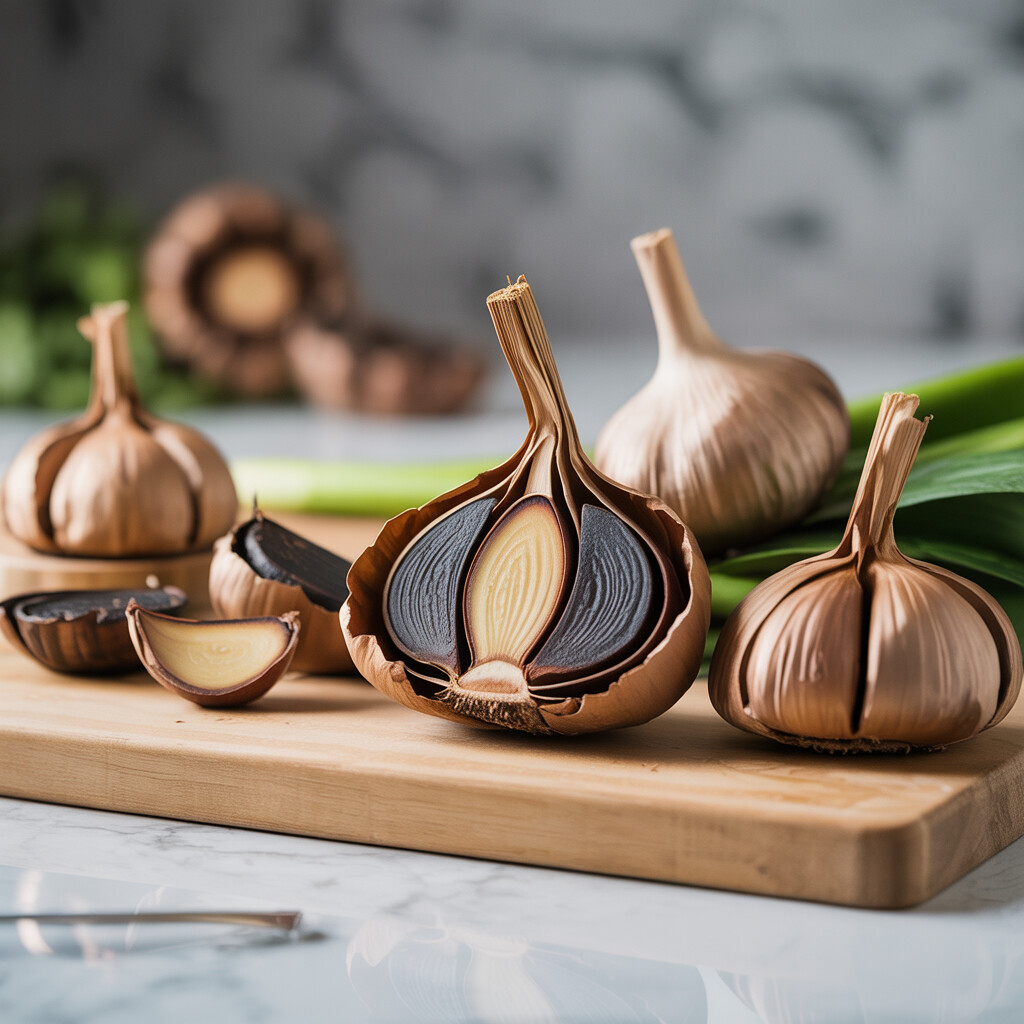
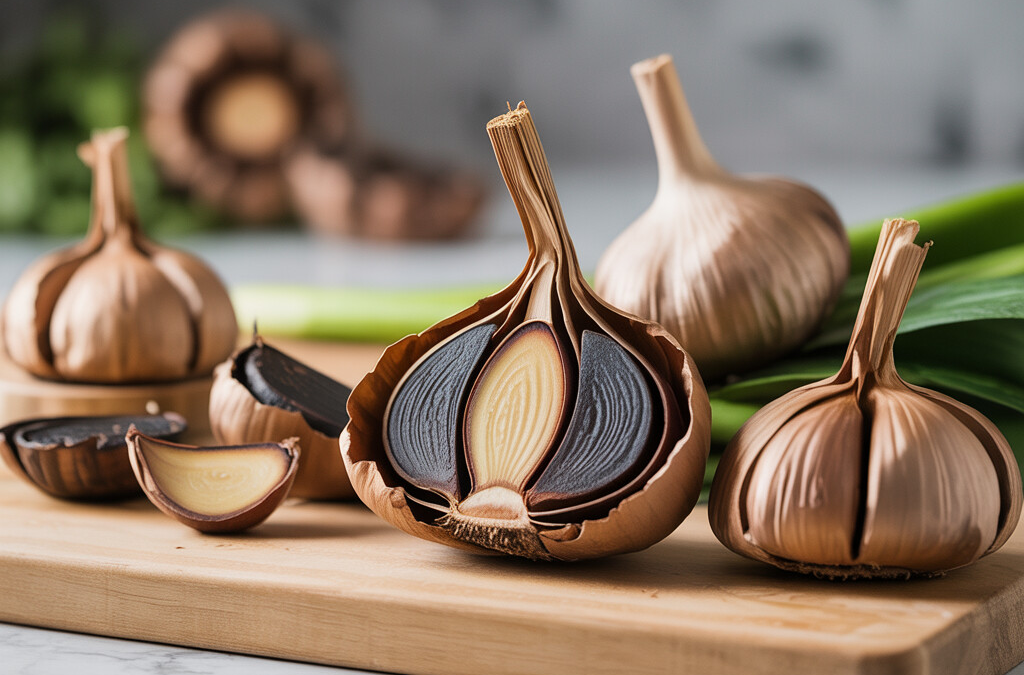
If you’ve ever peeked at the prices for black garlic at a fancy food store, you know it’s not cheap, and that’s even if you can find it at all. What makes this ingredient so sought after, anyway? Homemade black garlic blends the familiar sharpness of raw garlic with sweet fruit, tangy balsamic, and the savoriness of fresh soy sauce. It’s softer, almost chewy, and not harsh at all—more like adding a hint of umami magic to whatever you’re cooking.
Why Do Black Garlic Cooking Methods Matter?
The journey from ordinary garlic to black garlic is slow and gentle, and takes anywhere from two weeks to a month or more right in your own kitchen (don’t worry, your patience will pay off). The long stint at low, steady heat changes the garlic’s color, texture, and flavor through what science calls the Maillard Reaction. The cloves turn black, but they don’t burn—they just transform. Try pinching a finished clove, and you’ll notice how sticky it gets instead of collapsing like roasted garlic.
Black garlic’s wild ride in the heat not only brings out an almost molasses note, but it also leaves behind the strong aroma and spiciness everybody expects from fresh garlic. That black clove won’t linger on your breath either the way the white one might. It’s a sweet, malty, subtle taste, so if you’re into trying new things, you’ll fall in love within the first clove.
If you’re facing a garlic rut or just feel a bit adventurous, exploring the world of Black Garlic Flavor Profile Sweet Savory And Umami is a wildly fun way to flavor your food. You don’t need a fancy set-up, either. Black Garlic Preparation Methods range from using rice cookers and slow cookers to getting creative with dehydrators or even your humble oven. Once you’ve got it made, black garlic goes with everything from steak to salad dressing to, yes, even sandwiches.
Fresh black garlic has its own set of nutrients too. During its transformation, it’s rich in antioxidants, which pair nicely with its one-of-a-kind flavor. Heads up, though—if you partly take the healthy plunge to boost your well-being, make sure to check out Black Garlic Blood Sugar Control Natural Support.
You might be surprised at the comforting, cocoa-y aroma that fills your kitchen when you make your own batch at home. So, whether you want a bite-sized taste for yourself, a cool little kitchen project, or an everyday way to wow your taste buds, mastering Black Garlic Preparation Methods and Black Garlic Cooking Methods will unlock that pantry secret whenever gourmet is on the menu.
Essential Equipment for Black Garlic Preparation at Home
Prepping black garlic at home feels a bit like cooking low and slow Texas brisket for the first time. You can wing it, but having the right tools sets you up for sweet, sticky greatness. The good news: whether you go classic, rustic, or modern, most methods require only basic kitchen gear.
Putting Together Your Black Garlic Preparation Tool Kit
Making black garlic is all about creating the perfect warm, humid environment where bulbs can mellow out for weeks. There are a handful of handy gadgets that nail this without much fuss. The best Black Garlic Preparation Methods revolve around either a rice cooker, slow cooker, or dehydrator. If you have access to any of these, you’re on your way; just make sure your garlic bulbs are fresh, plump, and snug in their papery skins before you start.
For most first-timers, a rice cooker with a “keep warm” function sits at the top of the gear wish list. If you happen to own a slow cooker (hello, bargain bin at the church yard sale), it will also deliver good homemade black garlic results. Have a food dehydrator gathering dust from that one “healthy snacks” phase? You now have another reason to haul it up from your basement.
Those less-tool-inclined can even use a regular oven turned low, although it does spike your electric bill and may leave your place smelling like you’re roasting garlic for an Italian wedding all month. The key with all these tools is temperature control—steady, gentle heat in that 140 to 170°F range, plus humidity from the pectin and sugars within the garlic itself. Some folks recommend wrapping bulbs in foil to prevent them from drying out and infusing your gadget with a forever-strong aroma.
You don’t need gadgets with bells and whistles, nor do you need mountain man hardiness. Anyone can become the black garlic whisperer with a little patience, a few simple items, and a plan. Mastering the basics of Black Garlic Preparation Methods is the first door that opens to a whole house of homemade black garlic techniques, including stovetop experimentation for the bold at heart.
Step-by-Step Guide to Black Garlic Cooking Methods
Ready to become your friends’ black garlic supplier? Making this sweet, savory magic at home is a total game changer. Not only will you save money, but you’ll also get to eat it right when it’s at its freshest. If you’ve struggled finding high–quality bulbs in stores, you’re in the right place.
Comparing Black Garlic Homemade Techniques
Here’s a quick comparison of some handy Black Garlic preparation methods. These can help you pick what fits your kitchen and comfort level.
Black Garlic cooking methods all work pretty much the same: hold raw garlic cloves at low heat and high humidity for as long as your patience holds out. This slow “aging” process caramelizes the sugars inside each clove, turning everything dark and melty. That said, each tool has its own tweaks—and whoever owns a dehydrator earns bonus points for goofing around with heat/humidity settings.
To start, clean whole garlic bulbs—don’t peel them—then wrap them tightly in plastic wrap or foil to lock in moisture. Layer them gently in your chosen device, set the temp if yours allows, and let them sit on low for the recommended time above (longer gives darker, sweeter results). You’ll want to peek every few days to check moisture and, if needed, swap bulbs from top to bottom for even “cooking.” At some point you’ll feel like giving up, but trust the process! Your patience gets rewarded when you unwrap rich, nearly spreadable black gold.
At this stage, you can pop the cloves right out and eat them on cheese boards, make a savory sauce, or, if you’re like me, just gobble them by the handful thinking you’re very European now. Want more visuals and nitty-gritty? Check out this more in-depth breakdown: How To Make Black Garlic At Home A Simple Guide.
Confession: black garlic transforms so much from what you started with, it may just blow your mind when you try it. The mix of methods in this section lets you get started no matter your appliances; you’ll become the neighborhood expert on homemade black garlic techniques in no time. And when that happens, invite me over—I’ll bring wine.
Techniques for Making Black Garlic Using a Rice Cooker
A rice cooker turns out to be a secret weapon for black garlic preparation methods right at home. Since it keeps a steady, gentle warmth, it mimics the pro process without fancy gear. In my own kitchen, I set up my basic rice cooker with a batch of fresh, plump garlic bulbs. The key here: use the “keep warm” setting, not “cook.” Set the bulbs inside (don’t peel them), close the lid, and plan to wait for about three weeks. I know, it sounds like a hot commitment in the kitchen, but the payoff is incredible.
Step-by-Step Rice Cooker Techniques for Black Garlic Success
- Choose clean bulbs with tight, undamaged wraps.
- Place a folded paper towel under and over the bulbs to deal with any moisture during the transformation process.
- Hit “keep warm,” and leave the garlic undisturbed except for swapping out damp paper towels every few days.
- Make sure the lid is always on to trap that magical scent inside and keep the garlic humid.
You may want to put the cooker in your garage or on a balcony, since the aroma can be potent. But after twenty-one days or so: wow. The cloves inside will have changed to a deep coffee-black hue and offer a soft, fig-like sweetness and mellow richness. Check that the garlic is jet black and tender, not gooey or rock-hard.
Rice cookers are reliable tools for black garlic preparation methods. You might find yourself trying new black garlic cooking methods and not looking back. The best part? With so many homemade black garlic techniques to explore, you control the flavor adventure and always have this culinary jewel close at hand.
Homemade Black Garlic Techniques with a Slow Cooker
Some people call the slow cooker version “set it and forget it” for good reason. When describing Black Garlic Preparation Methods, slow cookers easily take the lead for simplicity and success at home. Got a basic plug-in slow cooker? No need for anything fancy, just a reliable low-watt one with a tight-fitting lid. The lid is a must: Black garlic needs a stable, steamy environment, and you don’t want to stink up your whole house.
Be sure to buy bulbs that feel tight and do not have soft or wrinkly spots. Clean off any loose outer skins, but leave the heads whole and intact—do not separate the cloves. Lay a couple layers of paper towels between the lid and the rim of the pot. This helps absorb moisture so you do not end up with garlic soup, and it keeps the garlic getting soft and syrupy.
Home Slow Cooker Artisan Method: Do It Yourself Black Garlic
Set your cleaned, whole garlic bulbs snug across the bottom of the slow cooker. Keep them a little spaced apart to let air and hidden steam circulate. Plug in the cooker. Set it to “keep warm.” That is the magic sweet spot. You want to avoid “low,” which tends to run a little hot, or (gasp) “high,” which will give you garlic charcoal and a toastier-than-intended kitchen. Things are about to get mildly smelly, so decide: Ventilate a little if you want a gentle melt of garlic perfume in the house. Or set that slow cooker outdoors, in the garage, or somewhere away from eager snack seekers (or in-laws).
I usually check the towels every two to three days, swapping them as needed when damp. Around week three (I know, I know—it takes every bit of that long), get excited: The cloves will look like dense chocolate, and the smell will go from sharp fresh garlic to deep figgy earth. Pull a couple bulbs hopefully around week three, then week four if you are patient (and lucky).
Of all the Black Garlic Preparation Methods, the slow cooker is the go-to for home cooks who live in the real world: It lets you skip pricey gadgets, still get authentic results, and prove you really did make it yourself. With the right mix of persistence and curiosity, your reward is tender, dark cloves perfect for layering into recipes or just eating straight—no “gourmet” store needed.
Alternative Black Garlic Preparation Methods: Dehydrators and Ovens
Let’s be real, not everyone has a magic rice cooker made just for black garlic. Sometimes, we make do. That’s where the dehydrator or oven comes in. If you are determined to flex your homemade Black Garlic Preparation Methods, it is time to try these often overlooked gadgets.
A dehydrator handles low, steady heat with gentle airflow to help coax those sharp garlic cloves into soft, dark treasures. It can take two to three weeks, depending on how powerful your unit is, but it is almost impossible to burn or over-dry the precious bulbs if you keep close tabs. Simply clean your garlic, place whole bulbs on dehydrator racks, and set for about 140–170°F. Check for stickiness and that luscious dark color, turning the bulbs every week or so.
Home Oven as Your Garlic Fermenter
Meanwhile, your home oven is more intense, so it comes with a big caution sign. Keep the temp as low as possible—ideally no more than 180°F—and protect the bulbs. Wrap each one tightly in foil or stick them in a covered pan on a cooling rack to keep air flowing. Even still, expect a risky ride home ovens tend to run hot, dry out cloves faster, and spike the “What’s that smell?” factor throughout your house. Still, for folks with no better options, extended time over several weeks will finally yield homemade black garlic, even if the cloves are denser in texture.
Both these Black Garlic Preparation Methods allow more home cooks to experiment with Techniques For Making Black Garlic. Sure, they require patience and some serious devotion. But the payoff is a deep sense of accomplishment. Trust me: nothing impresses a neighbor more than sliding a dark clove into their taste buds and casually saying, “Oh that? I made it myself.”
Safety Considerations in Black Garlic Cooking Methods
Keeping your kitchen safe matters, especially with new projects like Black Garlic Preparation Methods. Making black garlic means running something warm for two or three weeks, so some extra care goes a long way. As a home cook who leaves rice cookers or slow cookers humming for long stretches, here’s what I watch for most.
First, choose equipment in good working order. Most Black Garlic Cooking Methods use rice cookers or slow cookers, both of which hold a low, steady heat. Double check there are no frayed cords, cracks in glass lids, or exposed wiring anywhere. For the sake of your kitchen, use countertop appliances away from water, curtains, and pets.
Black Garlic Preparation Safety Tips
The gear itself may get hot to the touch after running for several days, so avoid draping anything over your cooker. Try tucking raw garlic into mesh bags for ventilation, then seal with heavy foil, parchment, or a towel over the container opening—never a tight plastic lid. This manages odor and excess moisture, although that earthy-sweet scent may linger a bit.
Moisture builds up with all Black Garlic Preparation Methods that cook for days at a time. Poke around for water pooling beneath or inside your cooker, and gently tip it out. Many garlic fans prop open the cooking lid one-sixteenth of an inch with wooden skewers for air flow; just keep your set-up solid so there is no risk of knock over.
Every Black Garlic Cooking Method also kicks off a strong, fruity aroma; you will wonder if you live at an Asian bakery. Try running your batch in a garage, outdoor kitchen, or protected porch for ventilation, and if you go with the oven, skip the broiler option. Even after curing your homemade black garlic, wash all surfaces (especially food-contact areas and hands) before munching the finished cloves.
In the end, home black garlic techniques are totally achievable in just about any American kitchen. Take reasonable steps, keep an eye out for cords and leaks, and you might be amazed how fun safer food science can be.
Storing and Preserving Your Homemade Black Garlic
Picture your kitchen brimming with the sweet-savory aroma from your first tray of black garlic. The hardest part is finding a good stash of this culinary gold. But the next big moment is figuring out how to store it to keep it super flavorful. Each clove is precious, and we’re not about to let a single one go to waste after all the slow-cooking love you put into these fancy bulbs.
Storage Practices to Keep Your Black Garlic Fresh
First off, keep your hard-earned black garlic in a sealed container. It’s best to tuck it away in the fridge or in a dark, dry place like a cool pantry. The fridge gives black garlic the longest shelf life and helps it stay tender instead of turning hard as a rock. If you have a vacuum sealer, it’s a great investment. It will keep out air and moisture, extend the life of your black garlic, and preserve the rich, molassesy flavors you worked so hard to create through different Black Garlic Preparation Methods. If you don’t, a mason jar or resealable bag will get the job done. Just get as much air out as you can.
Got more on hand than you’ll use in a couple of months? Wrap each bulb tightly in parchment, then freeze it. When you need a clove or two, just cut off what you need. Allow it to come up to room temp and you are good to go, without much loss in flavor or texture. Cloves might pick up a bit of freezer frost but a little blot with a paper towel and they’ll rise and shine.
If you like to flex your life-hack muscles, try storing some of your garlic immersed in oil. Just half-fill a small glass jar with peeled cloves, top with your favorite neutral oil (I love grape seed!) and stash it in the fridge. The oil makes a snappy dipping sauce and also gives your cloves a luxe, plump feel—think like what happens to a sun-dried tomato that takes a spa vacation in olive oil.
You can also experiment with drying your fully-fermented black garlic to make a seasoning powder. Pulse peeled cloves in a spice grinder or food processor until they are as fine as coffee grounds. Let the dust air dry for a day on a parchment-lined sheet pan, then stash it in an airtight shaker. It’s a flavor wallop on pizza or roasted veggies.
From diamonds in a rice cooker to the perfect punchline for pizza, your store of black garlic will outlive and outspice any store-bought cousin. Much better than worrying whether a fancy health store near me ran out of stock again. Mastering storage lets your payback for time spent learning Black Garlic Preparation Methods stand out with flavor, not waste.
Creative Culinary Uses for Your Homemade Black Garlic
You finally made black garlic at home, but what now? That savory, tangy magic deserves better than getting lost in the back of your fridge. Maybe you’re feeling a little stumped, and I get it. With store-bought black garlic sometimes hard to find, it may feel risky to toss the last of your homemade batch into a random recipe and hope for the best. Let’s talk best ways to bring those cloves front and center.
Unleashing Homemade Black Garlic in Your Favorite Dishes
Remember those creative Black Garlic Preparation Methods you just mastered? You can bring the same kind of outside-the-box thinking to your cooking. Forget using it the way you’d use regular garlic. Black garlic is a show-off by nature, so let it lead—not follow.
My go-to use is smashing black garlic into softened butter. Think of it as an instant upgrade for broccoli, a steak, or even popcorn. The bold flavors melt right in. Or try blending cloves into warm mayo or hummus; I use a fork to introduce black garlic to creamy dressings, stirring until it looks appropriately swirled and dramatic.
Throwing black garlic into red wine pan sauces or tomato soup brings a mellow sweetness that catches everyone off guard. Thinly sliced black garlic cloves work great on top of homemade pizza or roasted veggies, too—especially Brussels sprouts. Braver cooks might fold chopped cloves into rice, or blend them with oil and vinegar for an earthy vinaigrette.
Consider pairing your black garlic with mild white cheeses or sweet honey. Those contrasting flavors seem made for each other and—bonus—nobody will ever guess you made it at home. If you have a little leftover, press it into a paste and swirl it into scrambled eggs or dip a spoon into ramen just before serving.
So pop those homemade gems out of their skins, stock up on crackers and bright-green olive oil, and put “Get creative with Black Garlic Preparation Methods” at the top of your weekend goals. There may not be a Pulitzer Prize in your future, but there will be snacks.
Conclusion
Ready to jump in and try your hand at Black Garlic Preparation Methods? Walk through our steps for Black Garlic Cooking Methods that you can tackle at home, even with modest kitchen equipment. It opens a whole new world for folks who have struggled to find quality black garlic at local stores. From setups with a rice cooker or slow cooker all the way to alternate tips for ovens and dehydrators, the right basics are within your reach.
Now that you know how to make perfectly aged bulbs and how to easily store them, you are well on your way to making the most of this versatile ingredient right in your own kitchen. Time to show that black garlic is more than a passing trend—it deserves a place of honor in any home cook’s pantry. Whip up a batch, experiment in the kitchen, inspire your family, and show your friends why Black Garlic Preparation Methods inspire genuine culinary creativity.
FAQ
What are the basic Black Garlic Preparation Methods?
If you want black garlic at home, there are a few different ways to get there. Some people go with a rice cooker or slow cooker, while others use the oven or even a dehydrator. All Black Garlic Preparation Methods involve keeping whole bulbs in a humid, warm place for a long time. By slowly cooking garlic in this way, you unlock its deep umami flavor and turn each clove soft and black. My first try was with a rice cooker; the aroma filled my kitchen for weeks. You just set your clean bulbs inside, walk away, and let time work its magic.
Can you make black garlic without any special equipment?
Yes, you can create homemade black garlic using only your oven if you don’t own a rice cooker or dehydrator. This Black Garlic Preparation Method requires wrapping garlic bulbs tightly in foil, placing them in the oven at a low temperature, and waiting several weeks. Sure, an oven gives less precise results than a fancy fermenting box, but you’ll still get rich flavor and sticky texture if you check it every week. Last fall, my neighbor tried it this way and turned lackluster bulbs into smoky gold for her marinades.
How do you store black garlic after making it?
Once you master Black Garlic Preparation Methods, proper storage makes your investment worthwhile. You should keep bulbs or peeled cloves in an airtight container, refrigerated or in a cool, dry spot. Using clean hands, I peel the cloves and load a glass jar so I can reach for them quickly during the week. They don’t last as long if you leave them exposed but you’ll plow through them anyway after a few creative meals.
Do homemade Black Garlic Preparation Methods really taste as good as store-bought?
When you follow reliable Black Garlic Preparation Methods at home, you can create results as tasty as premium brands. Often, homemade versions capture even more complex flavor than mass-produced options because you tweak time, temperature, and humidity. On a rainy January, I pulled out my first hand-crafted batch and sliced some over ramen noodles. That moment proved home cooks like you or me can nail the textures and flavor development we crave. Everybody who makes their own will find their favorite tricks for dialing the sweetness or tang.