

How To Make Black Garlic At Home: A Simple Guide
Ever heard garlic described as “sweet, tangy, and packing umami goodness”? If not, let me introduce you to black garlic, the sticky jet-black gold chefs rave about. You can find a clove perched on a restaurant steak, but did you know you can learn How To Make Black Garlic At Home for a fraction of the price? Last weekend I tried my hand at home fermentation, and the aroma alone could make a vampire beg for forgiveness! If you love kitchen experiments or want to wow your food-loving friends, now is the perfect time to give it a go.
A recent survey found that 42% of home cooks want easier access to black garlic. No more supermarket sticker shock, funky preservatives, or ingredient guesswork! Start by learning How To Make Black Garlic At Home and spend more time cooking and less time shopping. These sticky bulbs have a mellow, balsamic-garlic punch I wish you could smell right now. In this Beginner’s Guide on how to make black garlic at home, I’ll walk you through what black garlic is, exactly what equipment you need, and surprise you with a few out-of-the-box flavors you never expected to try. Ready to dive in?
What Is Black Garlic and Why Make It at Home?
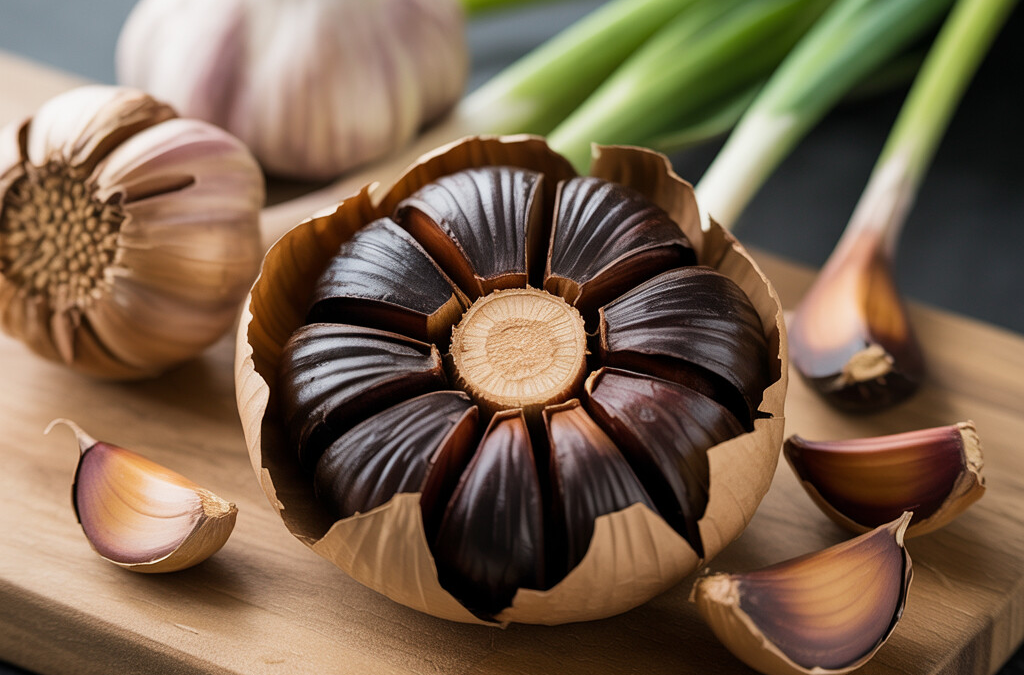
Black garlic is a truly special ingredient. If regular garlic is the reliable friend you count on for flavor, black garlic is the intriguing cousin who always makes a dish unforgettable. The color and taste change come from a low-temperature, controlled fermentation-like process that transforms bulbs of fresh garlic into sweet, umami-packed, jet-black treasures. Once you see this in person, it feels almost magical—like garlic cosplay for food lovers.
Why Bother With Homemade Black Garlic?
This leads to the next question: If you can find whole black garlic bulbs or cloves at the store, why learn how to make black garlic at home? Buying black garlic can get expensive, and quality isn’t always consistent. Sometimes the taste is flat, the texture dry, or there is a faint cardboard whiff that suggests someone stored it wrong. Making your own means you’re always getting it as tender and tangy as possible, and you know exactly what’s happening in the process. Your patience gets rewarded with clove after clove of soft, rich, chewy flavor bombs—zero jars of regret on your shelf.
How to make black garlic at home isn’t hard, just slow. The transformation takes three to six weeks, but the result is worth every day of waiting. One whiff of its sweet, balsamic-smelling aroma tells you that marvels can and do happen in your kitchen when you put garlic, heat, slow time, and hope together. Once you master this homemade black garlic recipe and a few simple black garlic preparation methods, you’ll be the neighbor everyone asks for advice from (or at least the suspect when their garlic goes missing). If you’re hooked now and want to learn even more, you might be interested in all the things black garlic does for your body. You can find it in the Category/Health Benefits Of Black Garlic section.
So if you love flavor-and who doesn’t?-and long for new kitchen magic, this DIY black garlic process could be the freshest update you’ll make this year. If you like garlic already (okay, love), black garlic will totally change the way you cook.
Essential Equipment for DIY Black Garlic
When you first search “How To Make Black Garlic At Home,” it might look like one of those projects where you’ll need a pressure cooker, special drying chamber, or some fancy fermentation gear. Let me assure you, you really don’t have to turn your kitchen into a sci-fi lab. Most of what you need for a solid homemade black garlic recipe is probably already close at hand or available at a local store. Since top-notch black garlic tends to disappear from the local grocery shelf fast, one of the best things about making it yourself is freedom from those wild price tags and tough-to-find options.
Major Equipment for Home Black Garlic Recipes
Slow Cookers: Old Reliable This is what I always start with, and what you’ll find in most “How To Make Black Garlic At Home” guides. Almost everyone has a classic slow cooker collecting dust in the cupboard, maybe leftover from that forgotten chili phase, or a rice cooker from college meal days. Either one works, as long as you can set it to ‘Keep Warm’ or a similar low, steady heat mode. Black garlic isn’t picky—it just needs warmth and time. Avoid higher settings or fancy upgrades like pressure settings which will overheat (or explode) your garlic.
Airtight Container: No Funky Fridges I recommend lining the inside of your slow cooker with foil or a heavy plastic liner, and using an extra outer layer or tight rubber band around the cooker’s lid, just in case your kitchen abhors the prospect of an around-the-clock earthy aroma. Garlic that’s transforming for two to three weeks will fill a room. That’s the deal! Keep it well-contained, or expect comments from downstairs neighbors.
Thermometer: Always Optional, Sometimes Reassuring Part of the beauty of this process is how little you have to do. If a little nervousness creeps in during your first batch, a simple thermometer helps take away the mystery so you’ll know whether or not your slow cooker keeps a safe 135 to 170 degrees Fahrenheit. It’s good to check at least once, especially if your slow cooker sits unused most of the year.
Low-Tech Extra Helpers for Black Garlic Magic
Aluminum Foil: Aluminum foil might be your garlic’s best friend. Wrapping bulbs individually keeps each clove neat and helps prevent everything from getting too dry. If you like, tuck the crates or bulbs into foil ‘tents’ so you won’t dry out the garlic or a corner of your slow-cook vessel. If your chosen slow or rice cooker tends to dry things out early, and you’ve had past trouble burning things around the edge, go double on the wrapping or cover the surface with damp paper towels for extra humidity.
Good-Quality Garlic Bulbs: Pick firm, heavy bulbs with skin flaps covering every clove. They shouldn’t be sprouting though—this only makes things taste bitter. Locally grown bulbs have the best texture, plus it’s nice to throw a bit of home soil into the mix if you can.
Whether you’re trying to create a fine-dining appetizer at home, or you just want a single-ingredient way to make egg and rice extra exciting, push onward! Once you see that first round of flavor-rich, glossy black cloves coming out of your kitchen, you’ll never ogle those $10 jars at the market the same way again.
Step-by-Step Guide: How to Make Black Garlic at Home
If you are eager to try black garlic but can’t get your hands on good quality bulbs, don’t sweat it. Making your own isn’t just possible, it’s quite fun in a mad scientist way. Here is How To Make Black Garlic At Home using the rice cooker method, which is the most practical path for beginners and those who like an easy DIY.
First, you will need a simple rice cooker, some whole garlic bulbs (feel free to use five to eight bulbs, just don’t crowd them), and a little kitchen counter or garage space. Dust off the machine first because once this baby starts going, it will fill your home with a pretty strong garlic aroma. Pro tip: the garage or a well-ventilated laundry room works best if you don’t want your entire place smelling like a delicious Italian restaurant. Trim the roots on the garlic bulbs so they sit flat, but do not pull all the papery skin off. Place them pointy side up into the cooker’s pot, giving each a little room to breathe. Don’t stack layers or crush them in tightly; otherwise, they might go mushy or ferment unevenly.
Once you have arranged your garlic heads, plug in your rice cooker, set it to the “keep warm” (not “cook”) setting, and double check it doesn’t flip off after an hour or two. If your machine wants to switch to off, sneak back once or twice a day to punch it back to “warm.” If your model stops after a few hours, get crafty and rig the lid to prevent it from closing fully, which usually disables that auto-off.
Here is a quick comparison I use at home to help people set up the right conditions on their first go.
Around the first week in the rice cooker, the bulbs will darken. By week two, you will see your garlic transform into a soft black clove, and the only way to truly know it’s finished is by starting to test a bulb after about three weeks. Wearing kitchen gloves, cut one open and squeeze a clove. If it is shiny black but still very dense and rubbery, leave the bulbs in. Test a new bulb every few days until you can easily spread a clove on toast. The taste should be sweet and pick up balsamic and tamarind notes.
Try not to keep fretting over the rice cooker as it works. Don’t lift the lid often or moisture and crucial heat will escape. It is a slow and steady process. If you don’t let them go long enough, you will be disappointed. Garlic prepped for black garlic can actually live in the kitchen longer on “warm” than you might think. Recipe developers even say there is no such thing as over-processing. When they look black on the outside and are nice and gooey inside, take them out. This is a labor of patience, and I have to warn you, there is no faster method out there. This is How To Make Black Garlic At Home—embrace the process, wait three weeks, and you’ll be rewarded with deep, sweet, umami cloves.
Alternative Black Garlic Preparation Methods
Not everyone has a rice cooker or the patience for the long wait that the traditional black garlic method involves. Luckily, there are other ways to get that signature sweet, earthy flavor right from your kitchen.
Try These Home Black Garlic Prep Hacks
You might not even need to invest in new kitchen equipment. Take a look at the methods below to see which will fit your schedule and space best:
- Slow Cooker Setup: A slow cooker is a cozy nest for regular bulbs of garlic. Set yours to its “warm” setting, wrap the bulbs in parchment, then foil, and rest them inside. Check every few days for doneness after week three, looking for deep black cloves that are soft and jammy. Keep the lid cracked or lay a folded kitchen towel under the lid to let moisture out for even black garlic development.
- Dehydrator Fix: Some folks swear by a dehydrator trick. Set it between 130 and 150 degrees Fahrenheit for three to six weeks, check those timers, rotate the bulbs, and cover your bases with parchment for a gentle hug that blocks too much circulation. After one week, you may notice a darkening aroma drifting through the house.
- DIY Bread Proofing Box: If you bake sourdough, you might already have a proofing box tucked away. It can double as a black garlic maker with a temperature at a steady 140 to 160 degrees Fahrenheit. Stash your bulbs (again: parchment first, then wrap in foil to prevent odor sneak-aways), and keep a small water bowl nearby.
- Oven Rig: While a full-size electric oven is too hot, some home chefs fudge it by leaving cloves of garlic in a tightly sealed, double-wrapped packet of foil in the oven’s “warm” drawer for a couple weeks. Peak into your manual for the actual temp of your oven’s “keep warm” setting. Under ideal conditions, that drawer reaches about 140 Fahrenheit, but it tends to fluctuate, which may lead to uneven scorching, spoiling, or bulbs going dry.
Keep in mind: no matter which DIY process you choose, low and slow is the golden rule. If you rush, the sugars will caramelize and scorch rather than go syrupy-sweet and well browned.
There is no need to forage all over town or fire up your Amazon app. How To Make Black Garlic At Home boils down to setting your bulbs up with gentle moisture and low, steady heat.
Try different batches in various appliances and keep a notebook on timing and setting. In time, you’ll home in on a signature homemade black garlic recipe you can recreate each season, whether you start with store-bought or freshly dug bulbs from a farm stand near you.
Curious to learn more about how black garlic’s magic might boost your mood and health? Sneak a peek after this section at our up-to-date guide to the surprising health benefits black garlic offers—trust me, your taste buds won’t be the only thing thanking you.
Safety Tips for Homemade Black Garlic
Making black garlic at home can feel intimidating, especially if you’ve heard horror stories about ruined bulbs or food safety worries. Trust me, I’ve burned a batch in an old rice cooker and nearly had my spouse tossing it outdoors to air out. The good news is that with a little vigilance, anyone can safely master how to make black garlic at home.
Preventing Contamination During Your Homemade Black Garlic Recipe
First off, start with clean hands and fresh, firm garlic bulbs. Give them a good wipe-down to brush away dirt. Toss any with visible mold or soft spots. A steady, low-temperature environment will help keep your cloves safe as they transform.
Plant your bulbs into the machine or device you’ll be using and don’t open it often. The dark, steamy heat is essential for aging, but every time you take a peek, you risk introducing bacteria, mold spores, or a rush of cold that can set things back.
Use a thermometer to double-check your temperature. Most black garlic preparation methods do best staying between 140 and 170°F. Too hot, and bitter, burned flavors pop up. Too cool, and you won’t reach safe aging temperatures and might allow bacteria to flourish. Do a quick sniff check after one or two weeks and discard anything with an off or sour aroma. Good black garlic smells like caramel or balsamic vinegar, not moldy cheese.
Once finished, let everything cool with the lid ajar before you transfer the tender, black cloves for storage. At this point, I usually pop a bulb and reward myself first—you know, for science.
For the highest confidence in food safety, try to finish your batch within four to six weeks. Don’t leave bulbs sitting out longer than needed or reuse any bulbs you suspect are rotten. When in doubt: toss it out.
If you decide to dive deeper into the art of black garlic, explore different aging containers and methods to see what you like best. While it’s tempting to experiment with garlic from backyard gardens and local farmers’ markets, stick to ones with intact skins and no bruising for the safest batch. Knowing how to make black garlic at home builds your own connection with healthy food habits, with the bonus of cost savings and fresh flavor right when you want it.
Storing and Using Your Homemade Black Garlic
When you finally get your hands on homemade black garlic, you’ll want to keep it fresh as long as possible. I get it. After all that patient waiting, you don’t want to lose your prize stash to mold. Good news: black garlic lasts longer than fresh garlic when you treat it right.
Storage Tips for Olive-Hued Garlic Goodness
Let the bulbs cool to room temperature before storing. They’re sticky, soft, and at this stage should smell sweet and tangy, with not a hint of funky sour or mold. I like wrapping whole bulbs in wax paper or placing them in a glass jar with a tight lid (anything airtight does the job). Pop it in the fridge and you’ll enjoy black garlic for several weeks. If you’ve made a larger batch or hate clutter in your fridge, you can freeze peeled cloves or even whole heads for up to half a year.
Making black garlic at home gives you the flexibility of having plenty on hand. Toss a few cloves in a jar of olive oil (kept cold, please) for super simple store-and-pour flavor. Hobby spice enthusiasts even dehydrate black garlic for snacking—those flavor-packed morsels are chewy and almost candy-like.
As for using your fragrant, jiggly bulbs, well, here’s the fun part. Slice or mash a couple of cloves to blend into aioli, salad dressing, or pasta sauce. Slather a few thin rounds on a burger or grilled steak for knockout umami. Soften the cloves and mix them into butter, then melt over veggies or grilled toast. And yes, even dessert fans will discover black garlic pairs surprisingly well with chocolate, in ice cream, or dusted over caramel.
Don’t let storage—or culinary imagination—confine your black garlic. There’s a world of flavor out there and this labor of love is totally up to the task. It’s got body, it’s got tang, it’s got presence. So dig in. And never wonder again how to make black garlic at home that you can actually use and savor. With simple tricks, your kitchen can now rival the fanciest grocery shelf or trendy chef’s pantry.
Troubleshooting Common Issues in Black Garlic Preparation
No matter how careful you are, even the best home cooks can face a few bumps when figuring out how to make black garlic at home. With a slow, weeks-long process running behind closed doors, the nerves build up: will it actually work? Luckily, I’ve messed up enough batches to help others sidestep some of the most frustrating issues with black garlic. Here are some quick fixes for your DIY black garlic adventure when things start to look just a bit off.
Identifying and Fixing Common Black Garlic Problems
Out of all the headaches, strings of pale gray bulbs or rock-hard, dried-out garlic heads are the most common. If your garlic comes out hard as a stone or pale yellow instead of that inky, sweet finish you craved, the issue is probably too little humidity or high heat. Pop a small, shallow dish of water inside your cooker for much-needed steam, or wrap the heads a bit looser in plastic wrap so the garlic can “breathe” but not wander off into jerky territory. If views of craggy green lines across the black flesh put you off at first glance, don’t panic: those are just discolored streaks from harmless sulfur movement during fermentation, not a sign something’s wrong. Just cut them out and keep munching.
If you pop open the rice cooker one day and a sharp, sour odor hits your nose, play it safe rather than sorry. While making black garlic calls for patience, funky ammonia smells or any patchy white, blue, or black fuzz is a fail. Cut your losses and start again with squeaky clean hands and gear for your next try. This is the best tip I can give anyone who asks about how to make black garlic at home: be a cleanliness fanatic. That includes ensuring minimal touching and dry hands when handling the fresh bulbs at the start.
Homemade black garlic magic happens with steady, gentle heat, high humidity, and a super-clean start. Get in the habit of documenting your process by keeping notes, and add a sticky on your calendar so you remember when to start sniff-testing near the finish line. As you experiment with other new DIY black garlic tricks and recipes, keep these tips close: you’ll find yourself answering questions for fellow home cooks instead of scouring forums after your first batch.
Intrigued? If you enjoyed getting your hands dirty with this how to make black garlic at home guide, keep me on speed dial! Helping readers unlock new ways to make budget-friendly fermenty treats from scratch makes my day, every single time.
Exploring the Culinary Versatility of Black Garlic
Once you have your batch of rich, jammy black garlic, you open up a new level in your cooking game. Even a little clove has a way of making an old beat-up salad seem brand new. If you made your black garlic at home, you did more than save money. You also made it easier to try more ideas, since you are not saving each precious bulb for some rare occasion.
Black Garlic Masterclass: Cooking and Pairing Ideas
Tasting black garlic for the first time gives most folks a surprise. Some people catch a whisper of balsamic vinegar, some think of aged olives, even hints of dried tomato. Now, take that depth and try it in your favorite foods.
Black garlic makes a pizza topping that steals the show, even above fire-roasted veggies or bacon. Add it to homemade hummus and your friends will have that bright-eyed, “What’s in this?!” moment. Buttered toast with mashed black garlic is quick and stunning. A spoonful blended into hot soup makes the whole pot feel fancier.
The uses of black garlic don’t stop at savory. People stir it into aioli for steak sandwiches or tacos, or use it pureed into dressings or vinaigrettes. Some cooks even use it in brownies. I’ve never had the guts to try that one, but hey—carry on, brave souls.
If you want your efforts in learning how to make black garlic at home go further, black garlic has a long shelf life in the fridge. It’s versatile and forgiving: a lovely rescue for bland leftovers, a simple baked potato, or a homemade pizza. It amps up the complexity without shouting its name.
There are plenty of easy black garlic uses for beginners and seasoned home cooks alike. For day-to-day ideas, spread it on toast, stir it into a stew, or blend it into sauces. For dinner parties, plan to put out at least one black garlic special, and either soak up the glory or play it humble.
Next time you hear some poor enthusiast moaning that there’s nowhere to buy truly great black garlic, let them in on your secret. “Want to learn how to make black garlic at home?” It just might inspire their kitchen to smell as good as yours.
Conclusion
You do not have to feel stuck when stores or online shops run out of premium black garlic. With your new skills and favorite equipment, you are ready to put the How To Make Black Garlic At Home guide to the test. The step-by-step instructions, including what to look out for, keep DIY simple, tasty, and safe. It is now easier to get that bold, sweet flavor year-round.
If you are curious to try a new method or want to expand your recipes, there is always room to grow. Sharing your creations could help strangers explore black garlic too. It is time to roll up your sleeves and discover how this preparatory labor of love can transform your next dish or snack. I do not think you will ever look at garlic the same way again. So, heat up your slow cooker, fridge, or rice maker, and let’s show the world just how versatile black garlic can be!
FAQ
How long does it take to make black garlic at home?
The journey to flavor city with black garlic takes some patience, but it is absolutely worth it. Expect about three to four weeks to complete the process, depending on your chosen Black Garlic Preparation Methods and the machine or setup you use. You will soon find that letting the transformed cloves sit in a warm, humid place rewards you with sweet, savory goodness. During my last attempt, I started noticing the classic aroma of deep umami filling my sunroom by the third week. The moment I sliced open a perfect clove, it was like finding hidden treasure. Stick with the process and follow the Homemade Black Garlic Recipe, and your kitchen will soon rival any gourmet shop.
Do I need a special machine for homemade black garlic?
When learning How To Make Black Garlic At Home, you might wonder if you need to invest in a fancy fermenting box or another specialty gadget. Thankfully, you do not need anything more high-tech than a basic rice cooker or a slow cooker that can maintain a constant warm setting. Many Black Garlic enthusiasts swear by simply using their slow cookers, wrapping garlic bulbs in foil to trap in steam and help enrich the flavors. That is exactly what I did on my first golden batch; the neighbors even started trading tomatoes for my stash once word got out. Consistent temperature for a couple of weeks is the real secret sauce here.
Can you speed up the DIY black garlic process safely?
Everyone dreams of a magic black garlic button – but that shortcut does not really exist if you want the signature texture and flavor. The key part of How To Make Black Garlic At Home is patience, which cannot be shortened by boosting the heat. Rushing it risks burning the cloves or leaving you with half-baked mush. If you keep your setup at exactly the right setting—the classic rice cooker “keep warm” mode—you will see the results in about a month. Make it a routine: mark your calendar, prep some good audiobooks or shows, and let time work the magic. The reward is soft, deeply savory garlic you cannot get from any store.
Why is humidity important in black garlic preparation methods?
Humidity keeps things moist and prevents the garlic from drying out or burning during the long fermentation period. If you are diving into How To Make Black Garlic At Home, make sure you trap steam around the bulbs by keeping them in skin and wrapping loosely in foil or parchment. Last summer, my basement batch flopped when I forgot this step, leaving me with sad, wrinkled, nearly fossilized cloves. Think of humidity like salt in a caramel—it softens, deepens flavors, and keeps every bite luscious. So, keep things steamy while your homemade black garlic transforms. You will get silky, Jet Black cloves sweet enough to eat out of your hand.